As some of you might have seen, recently I styled a flamingo themed 2nd birthday party for our daughter, Vivienne.
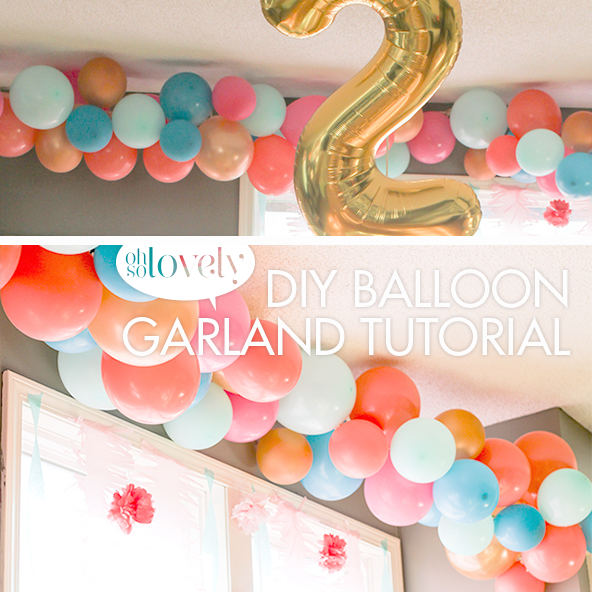
I always have so much fun decorating for parties, and this time I decided to try something I had never done before…balloon garland.
I thought some of you might be interested in learning how I created it.
Of course I was in the zone, and didn’t take as many photos as I should have. And even worse some were with my phone, but I figured the photos I do have would at least give you the idea. 🙂
I knew I wanted the balloons to go above the door and windows leading out to our deck, but was unsure what to use to actually build the base for the balloons to connect to. I tried a couple of options using items from around the house (one of them even included an old vacuum attachment hose…yeah…that one didn’t quite work, ha).
I finally decided that masking tape should do the trick. I found my wide masking tape, and got to work. I recommend using the wider tape—it just feels more sturdy.
I stuck the tape to one side of the wall, and just for extra security I put a tack over it (I’m a little makeshift like that). I took it to the random and annoying curtain rod hook (that angers me on a daily basis) and looped it around a couple of times making sure it was attached well. then I tore the tape strip.

Note: We randomly have a part of an old curtain hardware hook still on the wall above the windows (I accidentally stripped the screws on that piece when trying to remove it awhile back, and have tried the rubber band trick to try and remove it, but no luck).
I digress.
The annoying remaining hardware actually ended up helping me on this project, so yay for that, ha. If I hadn’t have had the hardware to work with I probably would have used one of those removable 3M hooks or even a large nail, so those would be good options for you all out there.

Once the tape strip is connected to a center point, loop the new strip of tape around the hook, and bring it to the other direction of where yo want ti to go. I wanted mine to go to another wall. Once the tape was where I wanted it, I added another tack.
You can probably get away without using the tacks, but I just wanted to make sure mine stayed put.
Once the tape was placed, I took my balloons in varying colors (purchased from Amazon and Target), and began attaching them to the tape.
Start with your first ballon and get it as close to the wall as you can. I recommend even masking taping it to the wall so you can’t see the starting point f the tape (and that pesky tack). Just tear off a small piece of tape and roll it so it’s stick on both sides.
I don’t have a photo of the first balloon being hung, but I’m sure you get the gist.
 |
Once you have the first balloon placed, just keep adding to it as it visually pleases you. Using tape as a base is nice because you can simply place so balloons directly to it, and they stick immediately.
Make sure you have the balloon placed exactly where you want it because it is difficult to remove the balloon from the tape without it popping (trust me, I know). 🙂
Take another small role of tape and use it to stick another balloon to the one on the tape.
You will just repeat this step until all of the tape base is all covered.

You’ll see gaps in some areas, and to fix that, simply roll more tape and start adding balloons in those gaps.
It takes awhile to get it started, but once you get going it feels repetitive, but it’s easy.
It was by far my fave part of the party decor, and I’m so glad I took the time to create it.

As I mentioned on Instagram last night, it’s still gong strong 11 days after I hung it!! I’m so impressed with how well it has held in place.
I know I need to take it down soon, but I haven’t been able to bring myself to do it yet, haha.


My crew doesn’t mind, thankfully, ha.
Oh, and here’s a quick photo collage recap of the rest of the party decor incase you’re interested…or happen to want to pin it! 😀

Have any of you ever created something like this with balloons? I’d love to hear how you did yours, and get any tips on how to make it easier for future use.
Hope everyone has a lovely day!
xoxo