DIY // PRETTY PAPER PINWHEELS

{also featured on kcmag.com}

Decorating for a party of any kind can get expensive and sometimes become stale and expected. If you want to add a fun, unique pop to your décor and save money along the way you should make your own paper pinwheels…pinwheels that even your favorite Kansas City  Country Club Plaza window display would envy!

You can substitute pinwheels for flowers in vases as I did for a recent engagement party. The best part – they were completely free to make since I used items I already had on hand.


I was a little intimidated with this project at first, but I caught on quickly and ended up making a lot more than I originally planned on. (ps. You might want to prepare to waste one practice pinwheel, haha.)


Here is what you will need:


+1 Letter sized sheet of pretty patterned paper for each pinwheel

(You can buy double sided scrapbook paper or you can download my free printable patterns and print your own double sided if you wish. In the KC area I recommend The ScrapBook Page or Urban Arts and Crafts or for pretty scrap book paper selections.)  

+Scissors

+1 unsharpened pencil with an eraser for each pinwheel (or you can get creative and use what you already have on hand – I used drinking straws)

+1 straight  pin for each pinwheel

+Small pliers/wire cutters


1. Gather your materials. If you choose to  print out your own preferred designs on a front and back heavy sheet of heavier paper
2. Cut your square(s) from the paper. For a small pinwheel I recommend a 5″ x 5″ square. For a large I recommend an 8″ x 8″ square. You can print off templates in both sizes (with cut marks) if you wish.
3. Cut 4 cuts at each point of your square. I cut about 2″ deep on the 5″ square and 3″ deep on the 8″ square.
4. Fold your flaps parallel with the cut. Make sure the end reaches beyond the middle of the pinwheel. (You can also leave the flaps curved and not folded if you wish – I made both options in my pinwheel batch.)
5. Take a straight pin and poke a hole through the end of each flap. Once through all four flaps, press through to the back of your pinwheel in the center.
6. Push the straight pin through the eraser of a pencil or a drinking straw if you prefer. Test the pinwheel for pin length, then cut off the sharp point with scissors or wire cutters. Push the now dull edge of the pin flush with the eraser.

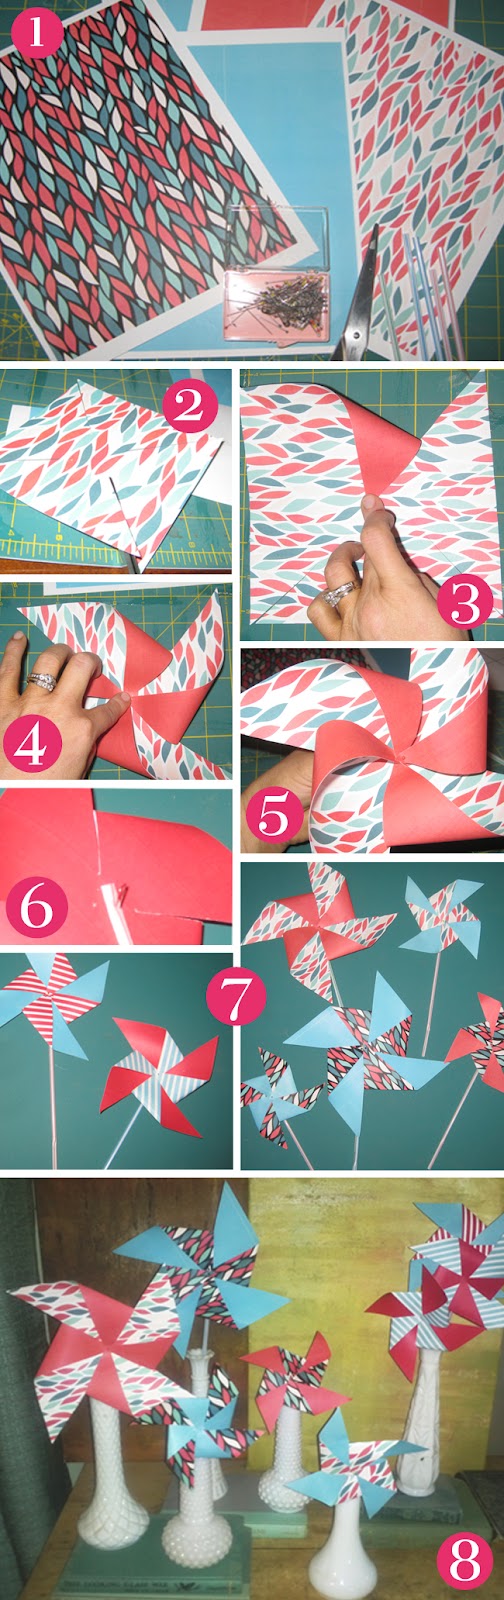
7. Enjoy your beautiful end product.

8. Place your pinwheels in varing sized bases in the place of flowers…and prepare to wow your guests!
Happy pinwheeling!

2 thoughts on “DIY // PRETTY PAPER PINWHEELS”

  1. This is perfect Audrey! I had seen these a while back and was going to look for a tutorial on how to make them this week! Perfect timing 🙂 Now to dig out the scrapbook paper and get crafting!

Comments are closed.