Do you have a dated kitchen? Learn all about our $500 DIY kitchen remodel below.
We were pleasantly surprised when the update caught the attention of Better Homes and Gardens, Apartment Therapy, and other popular publications.
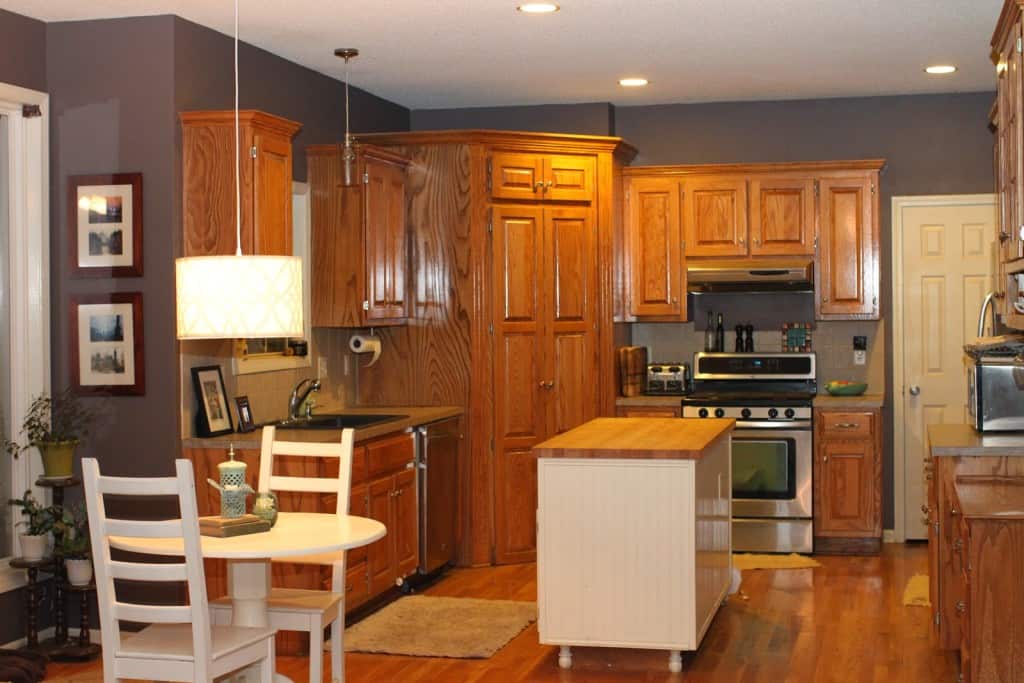
We bought our house 3 years ago and the kitchen looked something like this
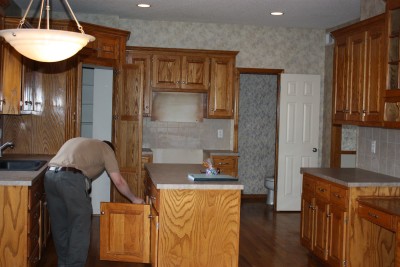

Can you say DATED?!? Even though it was built in 2002 and served as a model home for our subdivision early on, the wood everything and tacky wallpaper made it feel much older.
Thankfully Tedgar and I were able to see past this and envision something much more up to date, fresh and modern in our future kitchen.
We had to buy new appliances when we moved in, so we opted for stainless steel. This helped bring it into the now a little bit.
Then over a year ago, out of curiosity, we got a quote from a local home improvement company and to paint or stain our cabinets, install granite and a tile backsplash it was going to be roughly $12,000.
Being the frugal DIYer that I am, I just couldn’t stomach paying someone to do this project for us, and I knew Ted was handy (and patient) enough to tackle a future remodel – so I waited it out.
To help us “get by” with the kitchen as is for the time being, Ted added wainscoting and trim to the island and painted it a creamy white (Behr, lunar light) and I painted the walls a deep eggplant (an accidental color…long story) and the window and door trim the same creamy white (these were the only colors that sort of coordinated with the purple/mauve countertops and backsplash…barf).
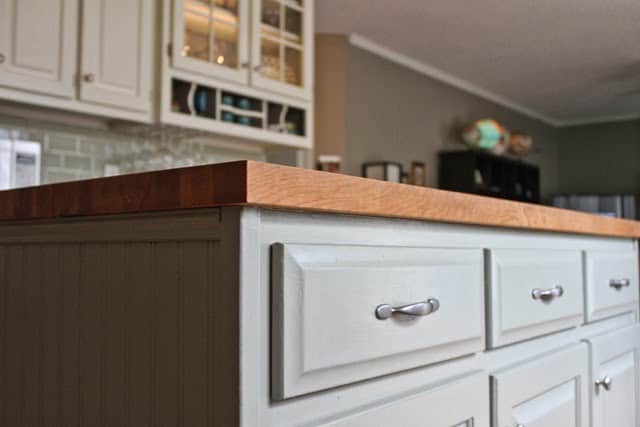
Then the addition of the updated pulls (which Ted got for free) and the butcher block island top (a very nice gift from Ted’s mom) helped make the room feel more tolerable (I’m so dramatic, I know:).
IN PROCESS PHOTO
Until we decided to pull the trigger on a compete $500 DIY kitchen remodel (which took us almost 2 months from start to finish).
Here are the details:
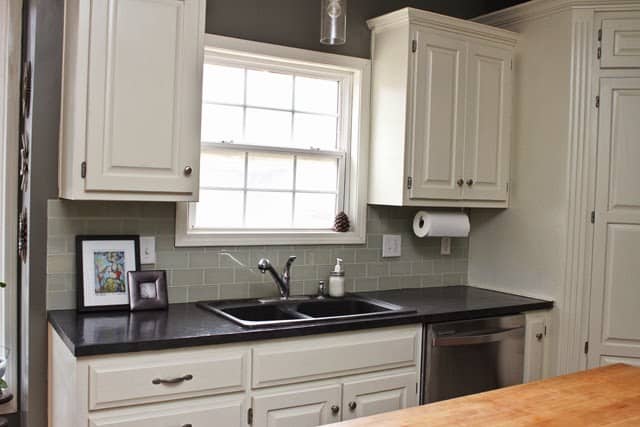
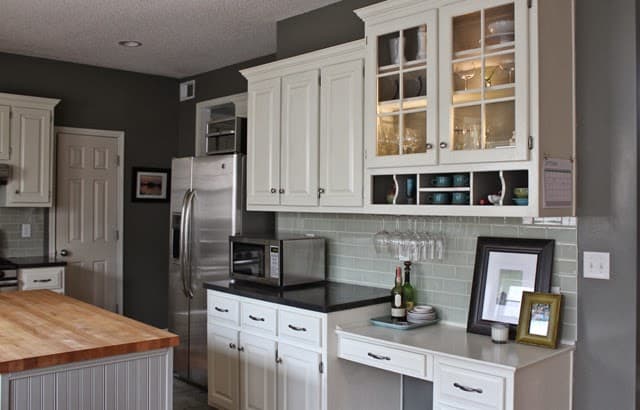
CABINETS
While perusing Pinterest one day I ran across this blog post with very detailed directions on how to paint your cabinets WITHOUT SANDING them first, I got the bug to finally paint the cabinets. I quickly got my hubby on board and we set out to Home Depot to buy our supplies the very next day (which ran us about $65).
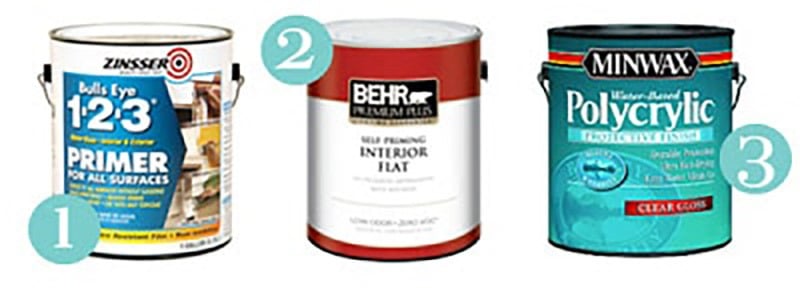
1. Bulls Eye 1-2-3 Primer for all surfaces
This is crucial and the only way I recommend painting cabinets without sanding them first.
2. Behr paint in lunar light (We used flat, but if I were to do it again, I’d use eggshell/semi-gloss or similar)
3. Polycrylic Water Based Protective Finish (semigloss)
We immediately got to work and after 3 days of priming, painting and sealing, we were done with the cabinets. We couldn’t believe how much brighter the kitchen had become.
That was exciting and all…but I couldn’t stand having the fresh white cabinets and keep our existing purple/mauve laminate countertops and backsplash!
COUNTERTOPS
We wanted new granite (or similar) countertops, but with a new roof, a baby on the way, a home refi (and a few other larger expenses) we just couldn’t swing it.
We investigated pouring our own concrete countertops, but decided that we were not ready to take the plunge quite yet, so I once again turned to Pinterest, where I stumbled upon this blog post with steps detailing how to pretty easily convert your existing countertops to polished concrete coated ones. We decided that this was the only way for us to go (at least for now until we are possibly ready to professionally update them in the future).

We ordered our 4. Ardex Feather Finish ![]() concrete mix from Amazon (1 bag was all we needed and it was under $20). It arrived on or doorstep a few days later and Ted got to work.
concrete mix from Amazon (1 bag was all we needed and it was under $20). It arrived on or doorstep a few days later and Ted got to work.
He followed the directions on the blog very closely, and a few days later we had smooth concrete covered countertops.
Ted took an orbital sander to them once they were dry to smooth them out even more (thanks mom and dad). We wanted to stain the concrete a darker charcoal color for a nice contrast, so we went to Home Depot and got this 5. concrete stain in Dark Coal STC-35 (for around $25).
We applied 2 coats with a spray bottle and a small paint roller. We wanted the end result to be very high gloss (wet look), so after the stain dried, we applied 4-5 coats of this 6. wet look sealer (also from Home Depot for around $25).
***Just a warning. The concrete stain has a navy blueish tint to it for a couple weeks or so after it is applied. We sealed over it while it had the blue tint. It eventually turned to black, so don’t be alarmed (like I was).***
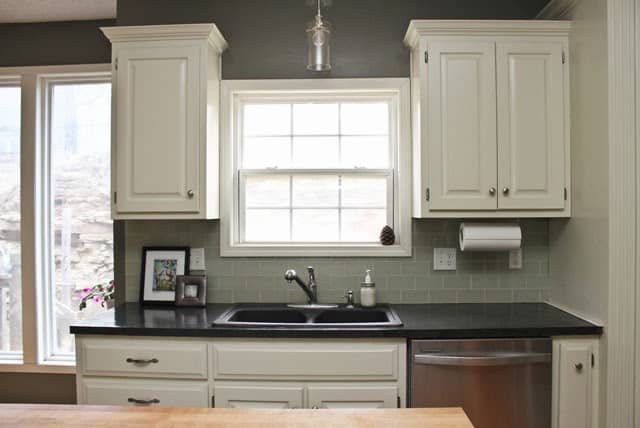
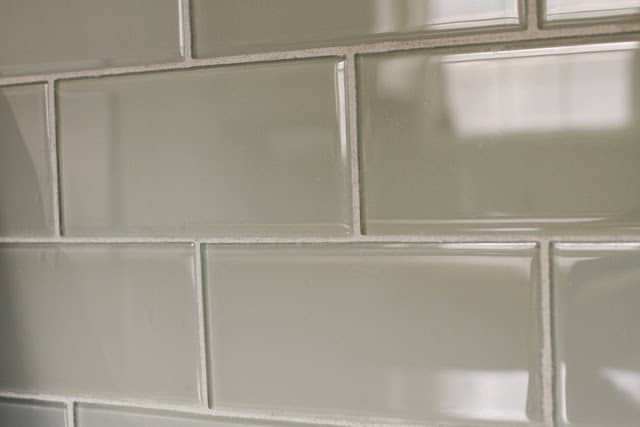
BACKSPLASH
Tiles came next…we knew all along that we would go with 3″ x 6″ subway tiles.
We have enough white subway tiles already on hand to complete the project (we got them for free awhile back), but felt that they might be too much white.
After collecting samples from various places, we finally decided on 35 sq. ft. of light olive colored glass subway tiles. This was our only “splurge” for this project (ran us just under $350 shipped).
We removed the old tiles and realized that there was no way around the fact that no matter how gentle and precise we were, we were tearing off drywall with each section of removed tile (nothing is ever as easy as you think it is going to be).
We decided that Ted would just rip the walls out from behind the older tile and re-sheetrock the areas that were damaged. We purchased the new sheetrock (for around $10) and Ted measured, cut and installed (he is my hero).
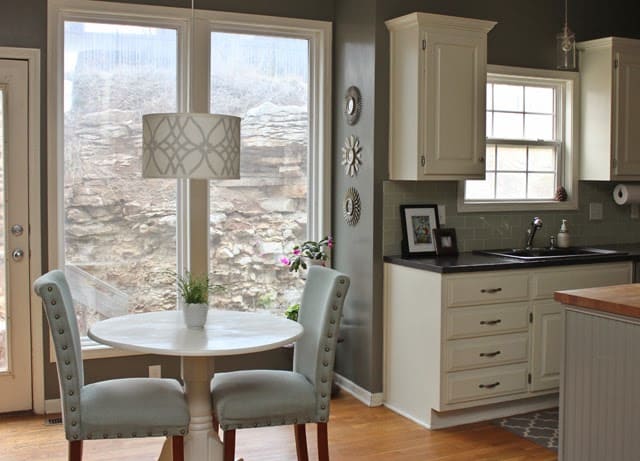
ISLAND PAINT
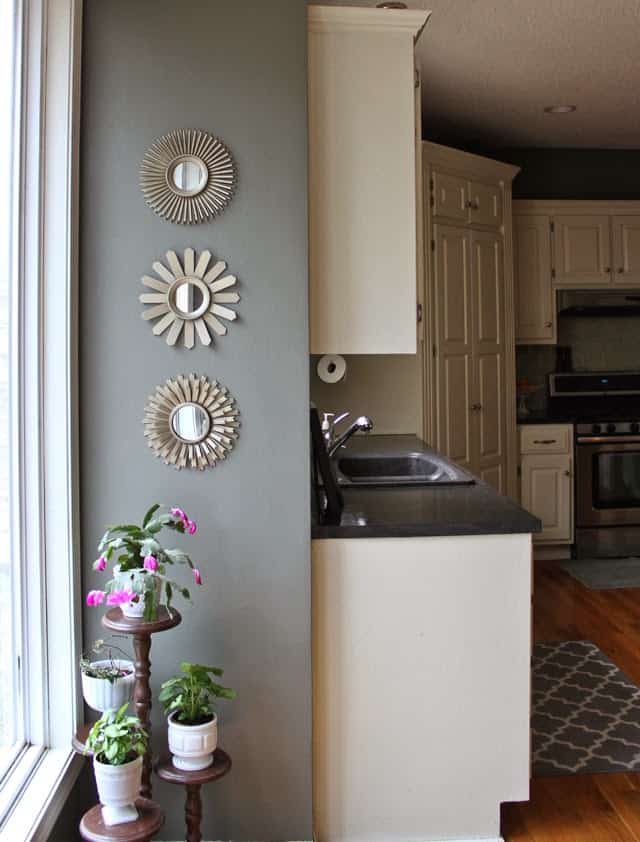
I painted the walls a deep shade of grayish green (Martha Stewart, thunderhead for about $25).
Then for the island I mixed the same wall paint with the creamy white paint (Behr, lunar light) in a ratio of 90 (thunderhead) / 10 (lunar light) and painted the island. I used the same paint mixture to paint the insides of our one double glass front cabinet and then installed 3 battery operated lights inside the cabinets to add some much needed light and interest.
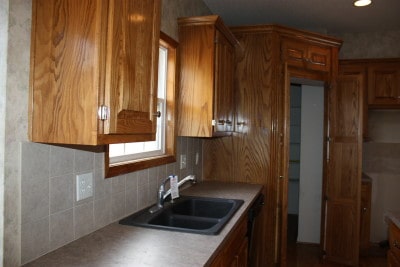
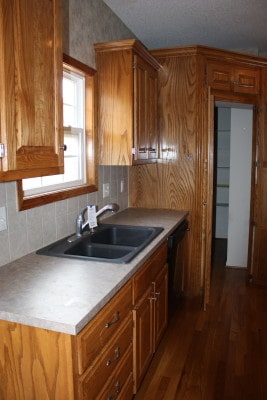
THE AFTER
…and FINALLY here are the finished results for our $500 DIY kitchen remodel:

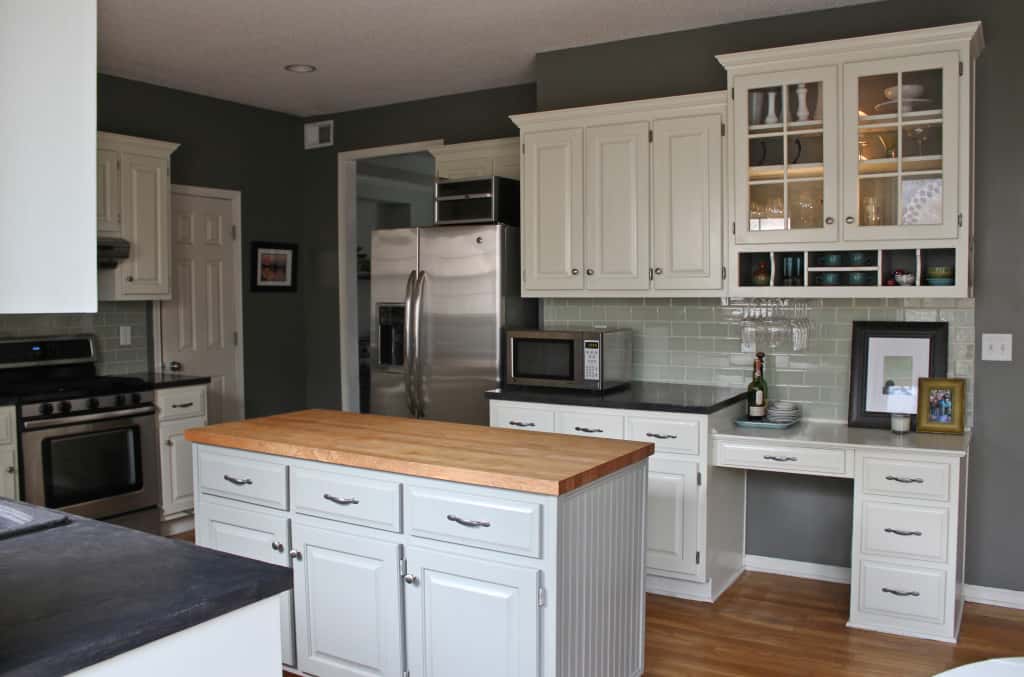
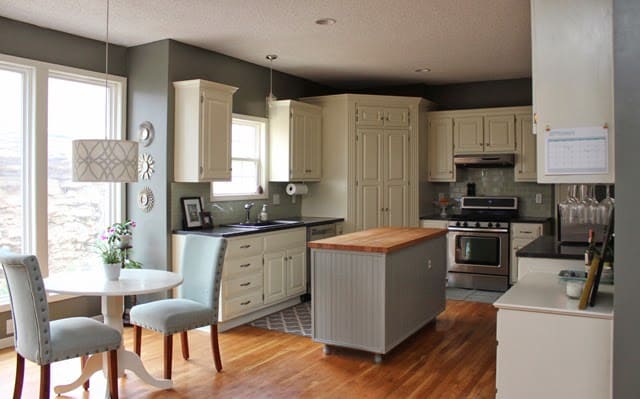
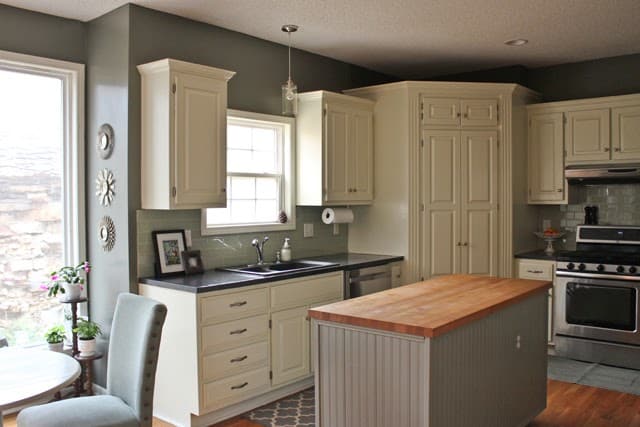

I think our $500 DIY kitchen remodel came together pretty nicely (if I do say so myself) and the grand total was only $520!
If we would have used the tiles we already had on hand it would have only been $173…crazy! We are very happy with our splurge though.
You can also check excellent articles on Bob Smith Tools.
*** Update:We recently sold this house. After 2.5 years, the cabinets were holding up great. The countertops were also doing really well. There are a few small chips in them, but I fix them by taking a Qtip of the concrete stain to them and adding another Q-tip of the sealer or by touching up the paint as needed. ***
Pin it for later!

PS. If you’re interested, you can see a few of our other home improvement projects by clicking here and here.

Pin our DIY $500 kitchen remodel for later!

You might also like the DIY remodel at our current house

Really nice write up. I work for Countertop Discounts Tampa and love the budget-friendly approach here. Really interested to get a status update on this post. I know it was written a while ago.
You mentioned some chipping in the coated concrete countertops. Are they still holding up or were you finally able to go with granite? The painted cabinets look stunning. What a transformation. Thanks for the post. Congratulations on managing a remodel with a baby on the way;-).
Nice information is kitchen gorgeous and very attractive
The gorgeous post learned a great deal Thanks greatly! Vine Vera Reviews
I like this topic.This site has lots of advantage.I found many interesting things from this site. It helps me in many ways.Thanks for posting this again.kitchen design essex
Hi, just essential you to know I have added your site to my Google bookmarks due to your latest and inspiring information. notepad printing
Great! We will be connecting to this enormous post on our site. Continue the good writing. notepad printing
Cheers! You have really allured me; I have no words to explain my feelings about your post. printed notepads
Loved your blog page!!!The stuff that you have remarked up here is superbly wonderful and I vigorously thank you for the same… how to get rid of bed bugs
Great site! I am loving it!! Will be back later to read some more.this is work is tremendous. Thank
kitchen cabinets online
A professional advice is always appreciated when needed and I have bookmarked your article
commercial cleaning
Residential cleaning
GREAT JOB!!!!!!!!!!!!!!!!!!!! I loved the way of your working. Impressed by your creative and innovative ideas. But i think you can also take help of professional people for this renovation as it will save your time and money. But anyway awesome work by you. Also check out this http://www.rsdesign.com.my.
It's not my very first time to visit this blog; I’m visiting this daily and acquire superb info from here day by day. MacFarlane Gro
I have checked this link this is really important for the people to get benefit from.the best steam mop online
Awesome Post !
Thanks for sharing do it yourself kitchen countertops ideas.
The gorgeous post learned a great deal Thanks greatly!home security system
I feel happiness to read the content that you are posting.kitchen renovations melbourne
You have combined creative design with originality.Whole renovation plan is awesome.Well done.In case you may need them, here are some more bathroom renovation ideas which you can exercise to get even better results.
granite exporters in india
Marble Exporters In India
good info thanks and the project looks good
I think I have never seen such blogs ever before that has complete things with all details which I want. So kindly update this ever for us.Induction Select
Hi there! First off, I absolutely LOVE this! You did an amazing job! We are wanting to do our countertops to see if we can get a similar look; however, the link to the instructions is broken
http://karapaslaydesigns.com/blogger/?q=http://karapaslaydesigns.blogspot.com/2012/07/diy-ardex-concrete-countertops.html
Any ideas?
Small change but massive difference. The paint job has really transformed the room!
Absolutely fabulous. Well done!
This is beautiful! I'm looking into options for a concrete table top. How has the Ardex held up? I'm worried it would chip or crack. Also, the link on how to do the countertops no longer exists. 🙁
You actually made the most of $500, the DIY kitchen remodel could not be much more attractive in $500 threshold. So, a good job in the end! job well done.
Awesome blog about kitchen remodeling…!!!!
Great job..The pics are awesome
I simply want to tell you that I am new to blogging and absolutely loved you're blog. Almost certainly I’m want to bookmark your blog. You surely come with exceptional articles. Thanks a lot for revealing your blog.
Free home renovation estimates
Excellent post man!
I strongly agree with your point that the Strong Relationships with your customer is the key,and Use the Language Your Customers Use. These two points are the main key points which we have to focus in B2B Marketing.
Free home renovation estimates
The issues involving FIFA coins have been a popular topic amongst scholars for many years. At first glance FIFA coins may seem unenchanting, however its study is a necessity for anyone wishing to intellectually advance beyond their childhood. While much has been written on its influence on contemporary living, several of today’s most brilliant minds seem incapable of recognizing its increasing relevance to understanding future generations.If you people love to play games you should visit once…http://www.fifacoinvip.co/ to buy fifa coins games http://www.buyfifacoin4u.com
Hi Audrey, your kitchen is beautiful. I tried commenting on your blog but it wouldn’t let me. I hope you don’t mind me emailing you. I have a question regarding your countertops. We are in the process of applying Ardex Feather Finish to ours but I'd like them black. You say you stained yours before sealing. I had read that the feather finish didn't accept stain evenly but yours look lovely. Did you have any trouble? Before seeing your blog I was going to try painting the cured countertops with General Finishes milk paint then sealing but I'd rather stain if you'd recommend it. Thank you,MaryAnn
Hi Audrey, your kitchen is beautiful. I have a question regarding your countertops. We are in the process of applying Ardex Feather Finish to ours but I'd like them black. You say you stained yours before sealing. I had read that the feather finish didn't accept stain evenly but yours look lovely. Did you have any trouble? Before seeing your blog I was going to try painting the cured countertops with General Finishes milk paint then sealing but I'd rather stain if you'd recommend it.
this looks great. quite the transformation…thanks for sharing!
Did your counters look blotchy at all before you stained them? I've done 4 coats of Ardex, sanded like crazy and they look kinda blotchy in places.
Nice post it is. I really thankfull to you for kind of post.
Rugs Cleaning Service | Rugs Cleaning Services
Hi Audrey. I am just about to tackle my kitchen cabinets. I did a tester cabinet. I have a couple streaks from the paint brush or the paint was too thick. did you have these issues? If so, any suggestions? thanks. ps your kitchen is beautiful. you did a great job
Hi! Your kitchen looks fabulous! Can I ask what you used to change the desk countertop (under the glass front cabinets)? thanks!
Hi! Just wondering how long you let the paint dry on the cabinets before painting the back side. And how many coats of poly did you do in the cabinets? Thank you!
I can't believe you got all of that done for $500! I'm assume you did most/all of the labor yourself? I think the countertops turned out fantastic. I'll have to look into doing something similar in our kitchen. Thanks for sharing your tips with us! http://www.tmgllc.org/about
In response to Clay's question…..
Hi, thanks for the photos. Fantastic job on everything! One question: I keep reading that that Ardex feather finish won't accept stain. Did you apply the stain directly to the dried Ardex? Or did you apply something else in between? Ardex also makes ARDEX SD-M which does accept stain, but if I can get the look you did just from the Feather Finish then I am good with that. Thanks
we used regular ardex, then stained it once it was sanded and dry. it took the stain very well and even gave the variation look of a natural stone.
Hi, thanks for the photos. Fantastic job on everything! One question: I keep reading that that Ardex feather finish won't accept stain. Did you apply the stain directly to the dried Ardex? Or did you apply something else in between? Ardex also makes ARDEX SD-M which does accept stain, but if I can get the look you did just from the Feather Finish then I am good with that.
Thanks
Great post! I am in the process of remodeling my house right now, so I've been doing a lot of research on this. Thanks for sharing!
Hi Karen. Can't get over how great your oak cupboards turned out! How much of the oak "graining" is visible through the paint , if any? I'm torn about painting my oak cupboards for fear too much grain will be visible. Thanks!
Hi Karen. Can't get over how great your oak cupboards turned out! How much of the oak "graining" is visible through the paint , if any? I'm torn about painting my oak cupboards for fear too much grain will be visible. Thanks!
Hi the kitchen is gorgeous! We just finished ours and I love it! My questions are- how is the paint holding up to constant use? Are the counters or cabinets chipping from liFes mishaps? After living with this update now for a few years what would you change?
Hi Karen. The cabinets are holding up PERFECTLY. There have been a few small chips in the counters, but they can be fixed by q-tipping some stain on the area and adding another q-tip of sealer over it. Overall, we would;t change a thing. So happy with this kitchen. 🙂
Everything looks amazing and I can't wait to tackle our cabinets this summer!
Where did you find your drum shade chandelier? It fits in perfectly!
Thanks 🙂
Thanks!! We got it from shades of light. It was pretty affordable. 🙂
Thanks! We got the light shade form shades of light .com 🙂
Thanks! We got it from shades of light .com
Wow, you guys did an incredible job! I don't even recognize the kitchen from the before photos. You did away with those terrible cabinets. My wife and I also want to renovate our kitchen, I wonder if we could do it as cheaply as you!
http://www.renovations.rdinet.com/your-project/
What a transformation! The place looks so much more open now!
Great post! We are redoing out kitchen right now, so this helped out a lot. Thanks for sharing!
This text may be value everyone’s attention. How will I learn more? shark or dyson
I Never ever found such edifying blogs. SuperCarpetCleaningLasVegas.com
That's such a crazy difference! I'm amazed at all of the great work you manged to do. I can't imagine how hard it must have been to remodel that dated kitchen. I'm currently in the works of remodeling my kitchen too, and it's not easy!
http://www.aspenkitchensinc.com/kitchen-remodels-in-colorado-springs/
Wow! What a huge difference! I love the subway tile backsplash and those white cabinets a lot. Just a perfect and beautiful kitchen.
onyx tile backsplash – http://www.eskandaristone.com/onyx-tile/
so inspired to tackle my kitchen! And no sanding! Did you use a regular brush or a roller for the cabinet doors? Are they holding up well? And is the color you chose a bright white or have any cream tent to them? Thanks!! Can't wait to start mine!
Hi. I used a purdy paint brush. I listed the paint color and other details in the blog post incase you need more details. 🙂
Still another question, please. After applying the polyurethane over the painted cabinets – what if you get ready to repaint the cabinets, or change the color? Would sanding then be required, or could you just use the same primer before painting again? Thanks – love your kitchen.
Greta, I'm not an expert, but a coat of primer would probably do the trick. a light sand might help as well before painting again.
Did you paint the inside of your cabinets white as well? if so, what tools did you use? What sort of brushes did you use for the cabinet doors? they don't look streaky at all!!
Thanks! 🙂 Yes we painted the insides of the doors. We used 2 purdy paintbrushes.
Hi there! I'm doing this project tonight! GAHHHHHHH. Can you tell me….did you use a foam roller to apply the stain and a foam roller to apply the top coat? Or a different kind?
Thanks!
Hi Thisle Rose. I used the mini paint roller to apply the stain only. I used a paint brush to apply the sealer. sorry – hope i caught you in time!! good luck!!
What a creative and innovative kitchen remodel idea! I really like brown color cabinets in your kitchen. Your kitchen looks amazing. I like hidden light which looks fantastic. I am impressed you did kitchen remodeling under $500 budget. Your kitchen remodeling ideas are effective as well as save money. Did great job.
OMG. This is GORGEOUS !! You've definitely inspired me to do something like this. White kitchen with light blue backsplash…. just gorgeous ! You should be so proud !!!! <3
Wow you are so sweet – thank you so much! 😀
This blog site has really a huge collection of articles with impressive information. Bob
Lovely kitchen transformation! We were "blessed" with ugly oak as well, and I've just finished the cabinets. We're waiting on hardware now. After reading about the feather finish on here and doing more research, we are going to tackle the counters next. Good to know it took the stain well! Is there anything you would have done differently on the counters? Thanks for the inspiration!
Thank you! And sorry you have the ugly oak too, but so glad you redid them!! What a great feeling, huh? I can't think of anything that we would have done differently on the counters. Good luck!! And I want to see the after photos. 🙂
I really love the way this kitchen turned out, my home kind of looks like the old pictures in this post and I can't believe how cheap it was. I would really love to do my kitchen like. It looks so flawless and modern. I especially love the cabinets and island. http://nerestorationandconstruction.com/index.html
Absolutely awesome! I would be so proud if I could do something like this!!
Kitchen remodeling
Wow, your kitchen is so beautiful. Love the gray, white theme. Perfect. By the way, I just like to share this website http://www.topnotchconstructionph.com/ for more renovation tips.
Found your blog excessively interesting indeed. I really enjoyed studying it.
home remodeling contractors
An important part while undergoing kitchen remodeling is to eliminate wasted steps. Paths throughout a kitchen should be wide. Wide walkaways provide comfort while working in the kitchen. All these and a lot other remodeling ideas are provided by home remodeling annapolis.
Love your kitchen remodel. I saw the pics in HGTV Mag. and came here to your blog. Where and what brand is the light with drum shade over the kitchen table? And where did you get the awesome chairs? Can you tell me how much?
Thank you!! The light was a gift from my mother-in-law from Shades of Light
http://www.shadesoflight.com/16-34-euro-fitter-trellis-linen-drum-lampshade.html
The chairs are on overstock. I go them for about $115 for the pair, but I used a coupon code. 🙂
http://www.overstock.com/Home-Garden/Sea-Foam-Nail-Head-Parsons-Chairs-Set-of-2/6559829/product.html?searchidx=0
Thanks for stopping by! 🙂
Would the paint work on laminate cabinets? My niece's kitchen is ugly and she has mismatched laminate cabinets. I thought painting them all one color would help until they can get new ones. Did you paint over the existing countertops? I just love this kitchen. I did my own kitchen with wall color very close to yours, with white cabinets and slate backsplash. We opened up some walls so our remodel cost over $25,000. Nice Job!
Last week I would have said "probably not," but a few days ago I painted a laminate desk using the exact same process from our kitchen wood cabinets and it looks great and seems very durable. The finished desk feels and looks exactly like our cabinets when we finished them. Definitely worth a try. 🙂
Oh…and PS. I did 2 coats of the 1-2-3 primer on the laminate desk.
Thanks!
Hi, I'm wondering how you did the white section on the desk? I'm thinking about doing the FF in white on my counters but can't find any photos of the white on anything…
We used the exact same paint and precess that we did on the cabinets on the white desk.
Love your countertop idea, was just wondering did you do the white countertop too and how did you do it. Also my husband would love to know if you had real wood cabinets to begin with. we do not but were wanting to paint ours but not sure how they will look afterwards. Thanks 🙂
Thanks! The island countertop is butcher block and it was a gift (from John Boos). Yes we had real wood cabinets to begin with.
Great job! Would you mind describing the staining process a little more? How long did you allow the ardex to cure before staining? Did you prep the sanded & cured surface with any other product prior to staining? How long did the stain take to dry prior to sealing? Thanks, any info you can provide will help me with our counter project
-sean
Hi Sean. Answers to your questions….
How long did you allow the ardex to cure before staining? I believe it was just 1 day before we stained
Did you prep the sanded & cured surface with any other product prior to staining? we did not
How long did the stain take to dry prior to sealing? we waited one day. the stain dries really quickly on the pours cement surface
I like your tips on kitchen remolding. I just want to know that: are you taking any help from any home inspection company. If yes, please also recommend it to me too!!
Redondo Beach home inspection
Nice Blog , Keep sharing more blog .
Kitchen Renovation | Home Renovation
The polycrylic sealer for the cabinets that you used is what we also bought, but it says to sand afterwards. Did you follow this step and how many coats did you apply? We loved your blog and used many of your tips while we are currently remodeling our kitchen! Thanks for the help and information!
We definitely DID NOT sand afterwards…and they still look great. Good luck!!
And thanks!
Great post! My wife and are remodeling our kitchen and have been debating over what kind of countertop we want. This article was really helpful. Keep up the good work!
Thanks! I hope you guys can decide on the countertop. 🙂 The ardex concrete is still holding up over a year later if that helps you at all. God luck!!
* good luck!!
Did you do the same treatment on your sink? Thanks so much for sharing this
Nope. That is the original sink we had. 🙂
Hi there – I am trying to achieve the look of soapstone on a budget. In your pictures your countertops looks a lot like soapstone, but you mentioned you used a sealer for a shiny look. I am wondering if they look like soapstone with the dark stain and sealer or if I should go with a more sating finish stain – if such a thing exists. Thanks so much for your help! – Leah
Hi! Maybe you can try this satin sealer:
http://www.lowes.com/pd_86421-1147-BC1_0__?productId=3501918
This kitchen was awesome! I would really like installing some glass splashbacks on my kitchen hope your design would greatly help me!
After cracking my counter top I contacted crack repair Northern California. My counter was good as new!
Shop Shop cheap mattress online
online from our Shop.bestpricemattressstore.com. You will find quality mattresses in a totally new way that delivers brand new first-quality products.is made with the highest quality materials and carefully finished for your ultimate comfort and long-lasting wear. Visit us to know more.
Your remodel looks great! We're in the process of buying a house, and I cannot wait to fix up the kitchen in it. I'm considering using the Ardex Feather Finish to update the counter tops, but I have read that it doesn't take up stain very well. How have your counters held up over the last year? Have you noticed any bubbling or cracking? Also, do the counters feel like concrete? One of the houses we viewed during our search had a faux marble counter that I'm pretty sure was a combination of paint and epoxy. It looked great, but it felt warm to the touch and sounded hollow when we knocked on it. If somebody was using your counter, would they be able to tell right away that it wasn't poured concrete? Thank you SOOOOO much for answering these questions!
Hey Audrey!
Thank you so much! I had tried to reply to your first post but I guess it didn't work. I was posting from my phone, that may be why. I am so excited I do not have to deal with that glue under the laminate. I pictured myself scraping for days to get all of that sticky mess off. I am getting started today! I have finished painting the cabinets and that alone makes a huge difference! I love how you mixed the cabinet and wall color for the island. That is a really good idea to tie them together. Thank you so much for your help!
Jacqueline M.
Hi Audrey, I apologize if this has already been answered, I read through many posts and didn't see it though. I am getting ready to start redoing our counter tops. I have the concrete, stain (I am using the same color stain you used, I LOVE yours!!) and the sealer. I am getting really excited! I read that you removed your laminate counter, correct? So I am guessing you applied the concrete to the what was under that. I was wondering how you prepared the surface before applying the concrete? Our laminate is pealing up and will be fairly easy to remove but I was not sure what to do to prep the surface. It is sticky under the laminate where the glue is remaining. I wasn't sure if I needed to remove the glue somehow or could just apply the concrete over it.
Thanks for your help!
Your kitchen looks amazing!
Hi Jacqueline!
My hubby did this part while I was to of town. I will ask him tonight and email you the details. Do you have a preferred email address or do you want me to reply to this post?
Thanks! 🙂
Jacqueline – I asked my husband and he said he just peeled off the laminate and it left behind a sticky residue everywhere over the plywood/material underneath. He just ardexed right over it with no problems. Good luck!!!
I was just wondering how the no sand cabinet method is holding up now that you have lived with your kitchen for over a year? It looks amazing from pictures!!!
it is holding up perfectly! i highly recommend it and thank you!! 🙂
LOVE your kitchen, you did a fantastic job! Did your husband remove the sink or did he just tape it off and apply the feather finish around it?
Thanks!! He did not remove the sink or tape it off. He just gently ordered around it. 🙂
It’s been over 10 months since I’ve remodeled my kitchen and the compliments received from my family and friends just keep coming. I hired the team at Classic Kitchen and Bath in Illinois because they are a family business and have been around for as long as I can remember. Remodeling can be quite a hassle but these guys made the process much simpler for me. It was a great experience working with the team at CKB- a company that prides itself on quality workmanship, timeliness, and customer service. Visit their website today http://www.myclassickitchenandbath.com or call 630-515-9151. I highly recommend them to anyone considering a new kitchen or bathroom.
Your bespoke kitchen looks ravishing after white paint. Whole look of the place become so different and bright as milk.
Thank you for posting your kitchen update! We have a rather large, old kitchen that we would like to give a face lift. We are planning on using your blog as inspiration….it would cost a ton to do a kitchen overhaul, so I'm so glad I've found this blog! What paint did you use for the baseboards under the cabinets? We painted ours recently, and they have chipped and look awful. We are planning on selling in about two years, so I'm hoping that painted cabinets and the feather finish concrete counters will hold up and look good for resale!
Glad you found inspiration here Nicole! We used Behr Lunar light paint for all of our baseboards. I would use the same primer that we used on our cabinets (Bulls Eye 1-2-3 Primer for all surfaces) on your baseboards. They will hold up beautifully I think. 🙂
This is absolutely gorgeous! And good decision to "splurge" on the backsplash! 🙂 It definitely pulls it all together. PS..I think I have a crush on your dining chairs..amazing 🙂
Thanks! 😀 The chairs are from overstock.com for around $120 for the pair. xo
Oh wow, that sure is an impressive home improvement project for only $500. Nicely done!
Thanks for sharing this interesting post.
Hi Audrey, I love your kitchen makeover! A lot of the elements are similar to my kitchen, which we are in the process of updating right now. Do you know where your cabinet knobs and drawer pulls came from? I really like the combination you have.
Thanks!
Jen
Hi Jennifer!
Thanks! I do not know where they came from – someone gave them to my hubby. I have a feeling they are from Home Depot (they are brushed nickel). Hope that helps!
Thanks for the blog! You have inspired my jump into painting kitchen cabinets! One question- did you sand the protective finish like it says on the can or just paint 3 coats and leave them as is between each coat?
Thanks!!!
Yay! We didn't sand at all. 🙂
Hope that helps!
Your kitchen is BEAUTIFUL! I am so impressed with how great it looks for such a small budget. I am considering doing the Ardex counters and was wondering how yours have held up? I have read on other blogs that they soak oil up immediately looking like a driveway would with a leaky car. I would appreciate any feedback.
Hi Allison!
Thank you. The counter tops have held up AMAZINGLY – way better than even expected one year later. We used enough sealer (4 or 5 coats at least) that there has been no water/oil/etc damage AT ALL.
There have been a few small nicks in the concrete and all I did to fix them is to dip a q-tip in the stain, dab it on the spot and dab some sealer on top of that. Back to good!
Hope that helps 🙂
Your kitchen looks beautiful. I have been reading that even polyacrylic will yellow when painted over white paint because it does not have UV blockers in it. Have you noticed any yellowing?
thanks lisa!! yes the poyacrylic yellowed the cream cabinet paint a tad immediately, but barely noticeable. i haven't noticed any other yellowing. hope that helps!! 🙂
What a wonderful kitchen! This is exactly what I wanted my kitchen to be. So perfect! We would love to cook in kitchen like this one.
Quartz worktops
I just did this to my counters and they turned out great. I am just concerned about the sealer…Is this food safe?
I believe so. But you might want to check the sealer packaging just to make sure.
Your kitchen looks amazing! We would love to do the same thing in our kitchen. I read in the comments above that your husband took all of the laminate off the countertops and applied the Feather Finish to the particle board underneath. Any tips for removing the laminate? We tried, but it was breaking off in small pieces:( Just wondering if he had a better method? Thanks so much!
so very sorry I am just now seeing this!!
thanks! our laminant broke off into smaller pieces as well. i am impatient … thankful my husband did this part. good luck! 🙂
great kitchen model by only 500$
So glad to see your post! I see a beautiful kitchen and also hope!
We are doing the same thing for our countertop but got stuck at this point. Used a wet look sealer as well (different brand) but after applying the first coat, some parts turned darker and some parts more glossy than the others. We do appreciate variations in color, just like yours, but ours looks so messy and awful now. Would doing more layers of the sealer help? I'm so worried that all our hard work would go down the drain.
Looks fantastic! My wife and I are getting ready to redo our kitchen and have a couple questions about the feather finish.
1. We have vomit-inducing laminate countertops that are in three or four pieces and there are visible gaps between them (and in some cases, height differences). What could we use to cover these gaps that would stand up to the cement and also keep the pieces from shifting and causing cracking?
2. We read in Kara Pasley's directions that you need a rough surface for the feather finish. How did you two accomplish this with yours?
Thanks so much for any help!
I wanted to know what cleaning products you use for both the cabinets and the counters? Your kitchen is beautiful! I am so excited to try some of these ideas this spring when taxes come back. We live in a house that's around 100 years old and needs so many updates! We have to completely replace the subfloor and flooring in both the dining room and kitchen this spring and really wanted to fix up the kitchen but it wasn't going to be in our budget but after seeing this I know we can do it!
thank you! we have used anything and everything to clean the counters and cabinets – all have worked just fine. hope that helps – sorry this is such a late reply. i haven't been getting the updates/questions on some posts.
Found you on Pinterest! BEAUTIFUL JOB!!! Although I am not a fan of white cabinets, I DO love the look of them and you have given me inspiration to redo our cabinets with the same products (but a dark dark finish for our cabinets)
I am thankful to the author for sharing such kind of valuable info. Good Post.
Solar installers new jersey
I learned a lot from reading your blog. Great Post.
austin luxury home builders
Very interesting post to know. Keep posting this kind of post, I enjoyed every bit of this blog.
Dovetail homes
I agree. Very good information I found in this post. Thanks.
Custom Home builder Virginia
Cool blog buddy I am gona suggest this to all my friends.
San Francisco Contractor
Really nice article for making money online and i want to search for making money online then i get this site and i book mark this site keep going
This kitchen remodel is gorgeous! And for only $500? WOW! I am truly impressed! Great job!
Thanks!! 🙂
Wow, its outstanding that this has been remodeled under $500 budget.Very inspiring.
This is a beautiful kitchen remodel. In glen ellyn il, I am currently remodeling my kitchen and I would love to use some of these ideas.
Good day, well, that's a good job and intelligent planning, more saving with quality DIY kitchen remodel.
Inspiring kitchen remodeling, you manage to save more with such 500 dollar budget, and the result was a professionally made kitchen. A thumbs up for you.
What form of the thunderhead did you use…flat, semi-gloss? Just curious since you mixed it with the lunar light in flat to paint the island too. Thanks!
I absolutely LOVE your redo! We bought the same paint (lunar light) and did a test cabinet and it's looking very yellow! Your cabinets look so much more white! How many coats of each did you use? Does the sealer change the color? Thanks so much!
This is an incredible kitchen renovation! I love the ideas and can't wait to use them at my own home in Bowen.
Most of people think about just outdoor remodeling, but interior is just as important. http://lowcountrydigs.com
Wow love these beautiful kitchen remodeling styles. Absolutely gorgeous!
Hi and greetings, just wondering. Referring to the title of this blog, so it means only $500 had been spent for renovation?
We spent $520 total, which included painting the cabinets, redoing our countertops to concrete and adding the subway tile back splash.
i really like the content of this blog. feeling great to see such kind of outstanding stuff.
Suppliers of beds and mattresses
What is the paint colors in bath and living room. Love it
I am actually not sure what the paint colors are. I thought I posted them in a comment/reply on one of my posts, but after digging for them I can't seem to locate that info 🙁 Sorry!
I love the look of the dark stained concrete counters. Now that you've them for a few months, have you noticed any stains or anything besides the small chips mentioned previously? I am considering doing this to my ugly laminate countertops but did some research and found others have noticed the concrete stains easily. What's your experience been like?
Thanks! Meagan
hi megan! i haven't noticed any staining at all. we did about 4-5 coats of sealer, so i think that helped a lot.
hope that helps! 🙂
your blog is really useful for many individuals I think. thanks this was really helpful while ive been looking for home Residential remodeling. Because many periods I have discovered the useful details which was really essential for me. Studying this your publish was excellent.
Love your kitchen, thinking of doing this. My only concern is I have 3 boys, worried about chipping and wear/tear. I see it's been 6 months. How are the cabinets holding up? Got a quote from cabinet maker to spray paint them with the most durable paint (auto body paint) and it was $1100!!!
sorry for the late reply…
the cabinets have held up PERFECTLY! so glad we did them.
We are going to look at some cabinets just like those tonight. When you painted could you get the painted perfectly smooth to where they look perfect?
we painted them with purdy brushes. They aren't perfect, but pretty close. If you rented/bought and used a paint sprayer it would be perfect and quicker. good luck!
Information For Choosing UK Glass Splashback Companies
UK Glass Splashback Companies
Love love! This post was an answer to my prayers! We are doing butcher block on our peninsula but really needed something a little less expensive for the rest of our countertops. I heard about the ardex and have been researching it, but was curious about making them darker so I am so glad I found this.
Glad you could find some inspiration here Deborah 🙂
Good luck with your project.
This looks fantastic.thank you so much for the advice.beds and mattresses for online sale
Amazing – thank you so much for this!!!
You're welcome Tara!
Thanks for sharing! I enjoyed this page. It was very informative. kitchen remodeler in Hamilton
What a beautiful kitchen,thank you so much for the advicebest place in UK for Beds and mattresses
This is so awesome, thanks for the advice.Kids Car Beds
I wondered if you could offer some advise regarding the counters. I did the Ardex on my counters as well (3 coats). After sanding (hours and hours), the result is a smooth surface, of both light gray and darker gray. The darker gray has a polished feel. Did you run into a similar problem? I wanted a consistent color. O I need more sanding (maybe a higher grit?), or should I attempt again with another layer of Feather Finish? Thanks for your help – reaching the end of a 3 week kitchen project and feeling frustrated!
Hi. Yes there is a "variation" look in our ardex countertops too. We stained over it and it gave a look similar to natural stone (see the next to last pic in the blog post). I honestly am not sure if you can get a consistent color with the ardex. We weren't able to and weren;t after that look, but really like the way it turned out. Not sure if that helps you or not…I'm sorry you aren't liking it.
Thank you – that helps a lot!! It's good to know that I'm not doing it "wrong"! Have a wonderful day!
I am sure you are doing it right. Hope it turns out great!
Gorgeous! Are your counter tops laminate underneath? Just wondering what the original material was. Great job!
thanks angie! they were laminate. my husband peeled all of the laminate off exposing the plywood, which he applied the concrete to. 🙂
I'm just getting in, sorry. I emailed you. Sorry to be an imposition, just at such as loss right now and feeling like I've really messed something up.
Yes, the Ardex. It just looks so thin at this point (first light coat), so delicate. Sorry to panic, just never done this kind of project.
Yeah, not going so well … if hubby is available for an email or phone consult, I'd appreciate it. I'm 2 coats in and it's really not coming together the way I thought it would. I don't know if it's supposed to be like this or if I've messed something up. At this point I'm really freaking out.
oh no.
do you want to email me your phone number? my husband ted can call you tonight at 630 (from a 785 prefix, fyi).
[email protected]
I just did the first bit of my counters and am kind of panicking. I know the first coat doesn't cover that well, and there is a drying/curing time beyond the few minutes it takes to turn light gray, but still, I can't help feeling worried. It looks so delicate at this point. It will harden and toughen up, right? And it's not going to wash off the first time I give them a good wipe down …. just looking for reassurance.
I'm in Independence, btw!
Hi Beth.
You are talking about the concrete part right? I can have my husband Ted write you tonight if you'd like since he is the one who did this part while i was out of town, but yes it cures very hard. As long as you sand them down after you apply your coats of concrete and let them dry, then apply the concrete sealer…no they will not wipe away. Ours are still super sturdy. food luck!!
i love local DIYers 🙂
Your kitchen looks amazing and we are going to do something very similar this Spring. I'm so grateful that you included all the links to some very helpful blogs. One quick question regarding the concrete. How as it held up over the past few months? Have hot pots or pans stained/damaged the integrity at all?
Thank you!
thank you! the concrete has held up great – much better than i ever expected! There are a few very small chips in it from regular wear and tear, but a q-tip dipped in the stain dabbed on it will fix these. We have spilt a lot of water and no damage. we are usually careful about not putting hot pans on it, so i can't vouch for that part. we are very happy with it and glad we went this route.
good luck!
What an incredible achievement! You did such a great job!
thanks very much! 🙂
Is that really the view you have out your windows…lucky girl!
haha, yes. we have an awesome rock cliff back there. we love it…a little colorado feel in kansas 🙂
Your kitchen is gorgeous! I really like your color choices.
thanks very much sarah!! 🙂
Great!!! yours kitchen remodeling is beautiful.
kitchen remodeler college station
thanks very much thomas!!
WOW! Just WOW!!
Thanks!! 🙂
Great transformation and for a phenomenal price!! Looks awesome!!!
Thank you Alycia! 🙂
Nice Photo…………..
I love your kitchen makeover and I'm hoping to do the same with my kitchen in a few weeks. I was hoping to get some more tips and specifics about the counter tops. And also how much cabinet and concrete sealer did you use? I have probably half the cabinets you do and close to the same amount of counter top. Any tips and help would be awesome!
thanks! we didn't even use a fourth of the containers of sealer. We have a ton of both left. let me know if you need any other info.
I LOVE YOUR KITCHEN! I am saving a picture of it to show the guy giving me an estimate for the remodel of our kitchen. Our cabinets are beyond saving so we are gutting the kitchen and redoing all of it. Ours is much smaller than yours, but am borrowing some key elements of your kitchen for mine. Hope mine turns out half as nice as yours.
awww thank you diana!! i hope your reno goes smoothly. 🙂
thanks for the kind words sarah!! i am happy that my post is helpful. good luck with your kitchen!! 🙂
This is so awesome, I just love this! We are looking to buy a house with a seriously dated kitchen as well and I've been looking for idea's and I just love all of yours. Thanks so much for taking the time to post pictures and your advice it's so appreciated!
thanks for the kind words sarah!! i am happy that my post is helpful. good luck with your kitchen!! 🙂
I am SO glad I ran across your blog! This is exactly what I want my builder grade kitchen to look like, but we are on a budget with a capital "B". You, however, have given me hope that it is actual doable! My husband and I will be tackling our cabinet project this weekend (painting them white) and want to get to the counters next (backsplash will be last. Planning on white subway tile). I do have a question about the counters, though: We will (hopefully) be selling our place sometime in the next three years as we expand our family, God willing, and I keep going back and forth on whether it would be worth it in the long run to splurge for stone counters to increase the resale value, or if something like this would be fine. Any thoughts?
hello! glad i could give you hope! 🙂
our countertops have only gotten more durable and have really gotten a lot of compliments. there are just a couple little nicks in them but are early fixable with just a q-tip and dab of concrete stain.
to your question…my rule of thumb is "keep up with your neighborhood" when selling. do most of the houses near you have upgrades like granite or natural stone? if so, i would suggest splurging for stone so that when you go to sell you are even with your market. you don;t have to get them now if money is tight…you can get them when you go to sell and do the inexpensive concrete alternative now.
if your neighborhood isn;t full of upgrades i think these concrete countertops are the way to go.
our neighborhood only has a couple of granite upgrades, so we aren't super pressured to upgrade in the future, but if the quality/durability of our existing countertops doesn't last more than a few years, we might upgrade. it is nice not to feel pressured to right now though.
at the end of the day if you guys did the concrete ones now, which will save you tons of $$, you can always start saving now for an upgrade in a few years. i like these because they are just so cost effective and great for the time being. 🙂
another alternative: do your own diy poured concrete countertops…those are guaranteed to last a long time and are actually pretty popular/considered high style now.
good luck with your remodel – i hope it goes well. 🙂
audrey
ps. sorry for the typos…i am typing one handed with a baby on my lap 🙂
Thanks so much for the advice!
-Lindsay
no problem lindsey! 🙂
This looks fantastic. How have the countertops held up with food prep and cooking?
thanks tassi! the countertops have actually cured and hardened even more and have been pretty durable. there are a couple small chips/scratches but they can be fixed with a q-tip dipped into the stain and applied. we think they will hold up for at least a few more years until we might upgrade to a more durable stone.
also the sealant has protected again any water damage ad has been great for food prep (we mostly use our butcher block island countertop for food prep though).
we are very pleased with these super affordable countertops 🙂
You had black appliances before, now you have stainless steel…were these new or did you somehow reface those as well?
kate, the black appliances are actually from the realtor photos. the people who sold the house took the appliances, so we had to buy new back in 2010 when we bought (boo!). i have seen some people resurface to stainless though. 🙂
Thank you Arthur!!
The greenish gray walls really complement the white cabinets, and the splashbacks don’t clash too much with them, so that’s most definitely a great thing! The countertops looks amazing! Hard to imagine that it was a DIY project.
Arthur
Contractor Express
Did you paint the inside of the cabinets? Great job!
While I do like the stained look of the cabinets before, the new look does have a modern feel to it. And it provides a nice contrast to the hardwood floors. The tiles as backsplash is also a nice touch.
Tittle Brothers
Thanks Kip!
hi! thanks!!
the feather finish took the stain a little unevenly, but we actually wanted that. it looks more like a natural stone with the imperfections. we have gotten a lot of good compliments on it when people come over. our original counters are squared off, thankfully.
thanks for visiting..let me know if you have any more questions. 🙂
good luck!!
Love your kitchen makeover! We are in a similar situation right now- just moved and wanting new counter tops but don't have the budget for granite or soapstone since all budget is going to hardwood floors. This concrete technique is the answer I've been looking for! 2 quick questions- did you have any trouble getting an even look when you rolled on the stain (the concrete tut specifies that the feather finish won't take stain evenly and suggested a different product). And secondly, did your original counters have a rounded edge or no? Hard to see in the before pic. Mine are rounded, and I'm wishing they weren't…feels like a dead giveaway that they're laminate. Hmmm. Thanks for the inspiration! –cheers
Wow, you would think with a kitchen that big, all of those cabinets etc it would be more than $65 to get started!! Wow!
Following!
Visiting from YoungHouseLove Forum,
Smiles, MaytagNMom in Illinois
We barely even used half of our paint gallon and a quarter of our primer…a little goes a long way i guess 😀
Oh wow. Your kitchen is beautiful and exactly what my husband and I have been imagining for our kitchen (from the 1930s!!) – but we don't have the budget for a monster overhaul. You have given us the inspiration and confidence that we can transform the space on our own! Thank you!
Is the counter sealer ok to eat off of? And how has the clean up been with it?
i am so glad you are inspired, amy…i am obsessed with saving $$…and there are always ways to do it 🙂
the sealer seems perfectly fine and hasn't given us any problems. seems safe to me, but i am no health code expert, ha. the clean up has been just like any other countertop. there are however a few small surface chips, but they are barely noticeable. i will just dip a q-tip n the small chips and dab it on and then follow with a quick dab of sealer.
we are not expecting these counters to hold up for more than 3 or so years…at that point we should be able to afford a more durable surface. we shall see 🙂
So glad I came across your site – your kitchen is exactly how I want to update ours (with a few tweaks) – and you gave me the inspiration I need to know I can do it on a budget! Now I can hardly wait for summer to roll around so I can get started!
i am so glad you found some inspiration here!! good luck to you on your remodel. it will be so worth it! 🙂
Did you brush the paint on or did you use rollers? Whichever method, what kind of brushes and rollers?
We used a Purty brand angled brush. rollers would have worked well too though.
I am painting my bathroom cabinets & wanted to use the polycrylic sealer, when I asked at Lowe's they stated polycrylic is used for stains. I mentioned I have read many people are using this to place over painted cabinets. I reviewed the can and it does state stains, have you noticed anything with using this on your cabinets?
We used it over our paint and it worked great. It darkened the cream just a tiny bit…barely noticeable. No complaints here. I am sure whatever sealer you use will work just find. Good luck!
AWESOME! I know having wooden furnishings in the kitchen looks very nice already but then, living with it for a long period can also be tiring for the eyes. You’ve done an excellent job in your redo and I love it so much! I’m having a house renovation this coming May and I’m pretty sure that this design can be a very nice inspiration for my kitchen. 🙂
Thanks so much Helene!! 🙂 Good luck with your reno!
What a beautiful kitchen! This is exactly what I want to do to mine! Are the cabinets still durable since they have been painted or does it chip off? Do they seem sticky to the touch? And did you use the same painting technique for the trim in your house as you did for the cabinets?
Thanks! The cabinets are very durable…there are a couple of chips that happened while they were drying, but they were touched up and are good to go now. They are not sticky to the touch at all.
The trim that my husband painted (about 25% of the house) used a similar technique (he is more patient and a perfectionist than me), the 75% of the trim I painted was a little more lazy, ha. My trim has a few chips in it, which have been touched up, and works for me. 🙂
Good luck with your kitchen project!
thanks brittany! 😀
HUGE difference!!! That backsplash is total perfection — it was a good splurge!! :))
The information you have posted is very useful. The sites you have referred was good. Thanks for sharing… Make instant