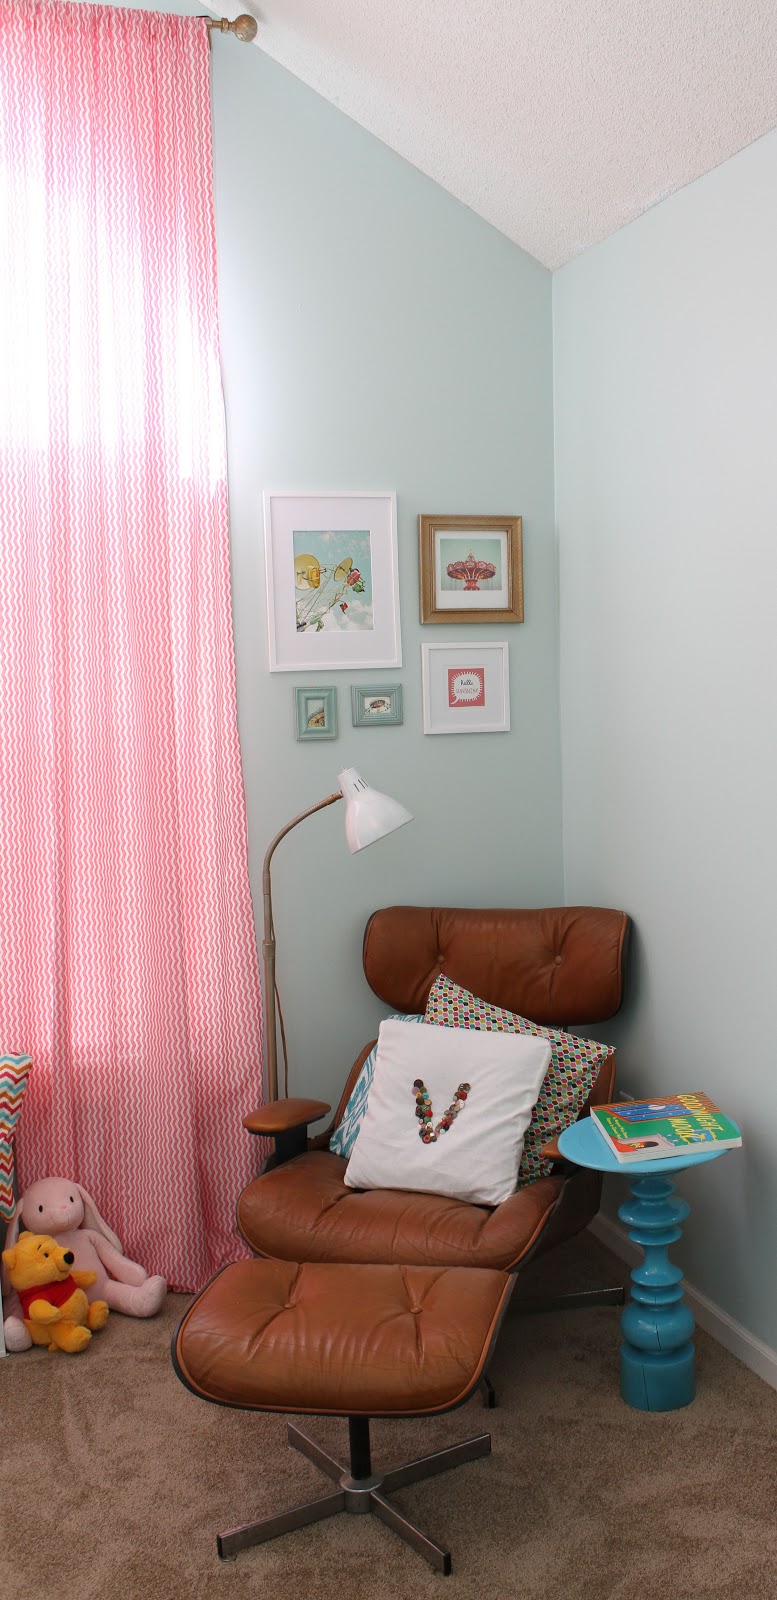
ITEMS THAT I CREATED OR REPURPOSED MYSELF:
+ Sewed custom floor to ceiling curtains
The fabric, which was purchased from etsy cost about $50 and only took about a half an hour to sew. I used all of my great grandma’s and great aunt’s old sewing materials, threads, etc., which make the curtains even more special to me.
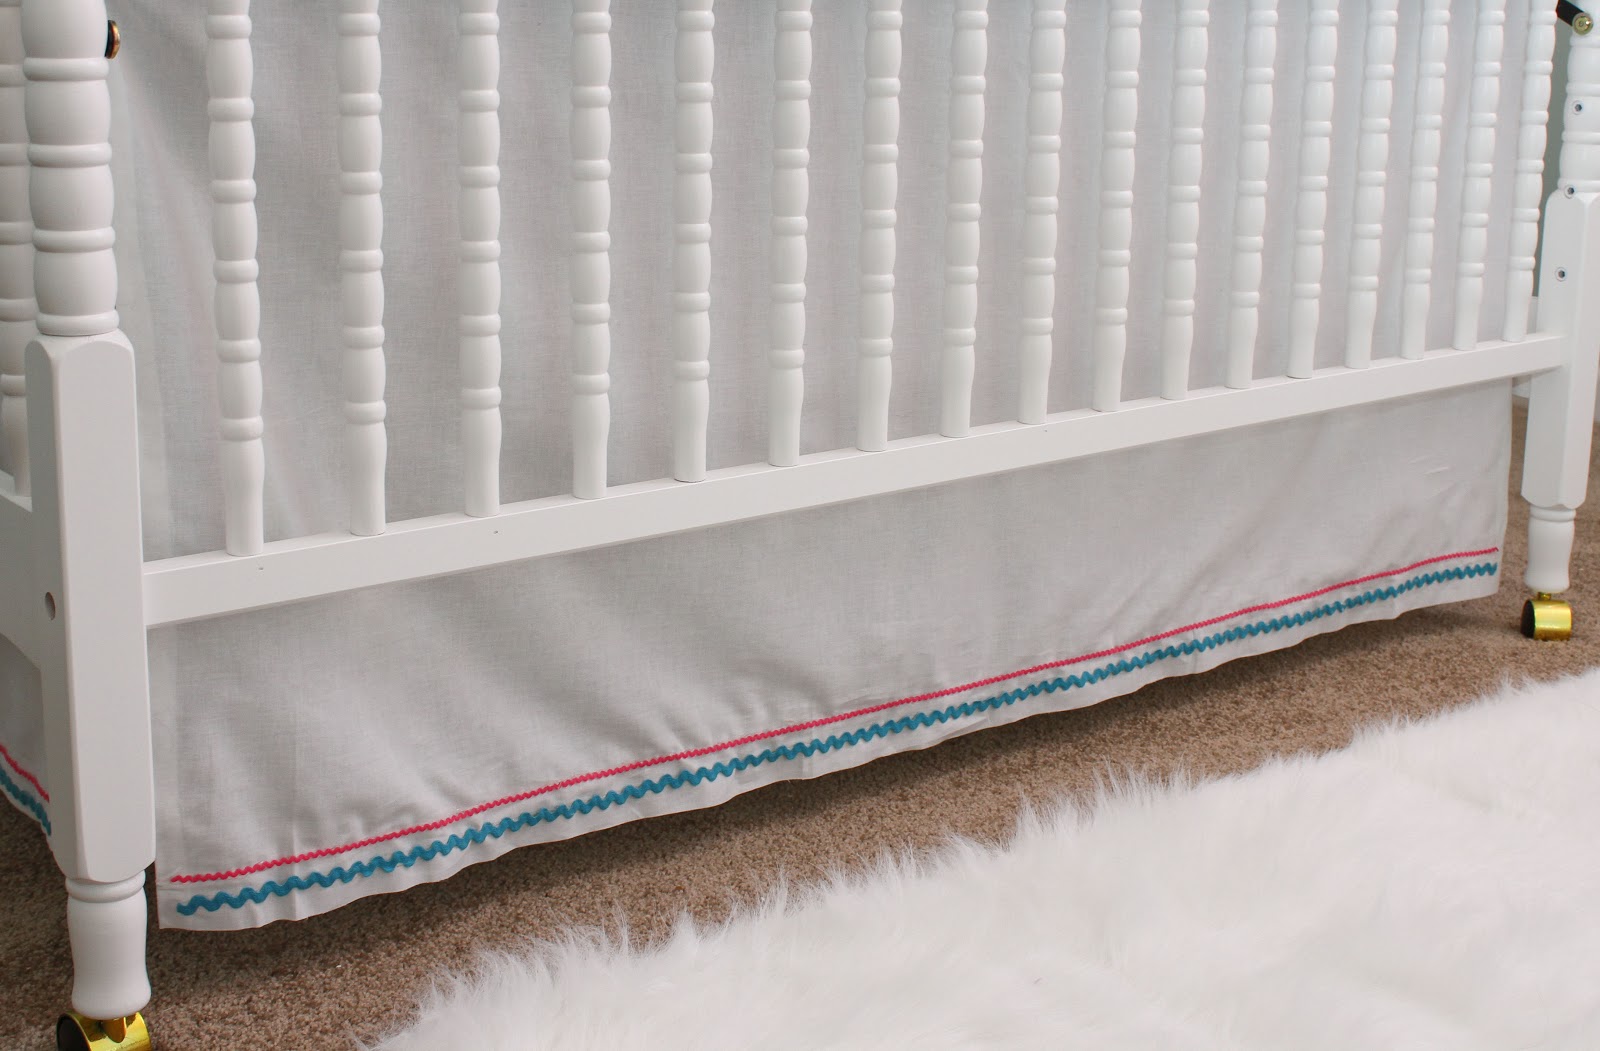
+ Sewed a simple crib skirt
I spent $5 on simple white fabric from Hobby Lobby and followed the instruction of
this blog on how to create the crib skirting. I hot glued the ric rac to the bottom or the fabric to add some inexpensive interest. I used the same ric rac on my diy lamp and middle curtain panel as well to tie it all together very simply.
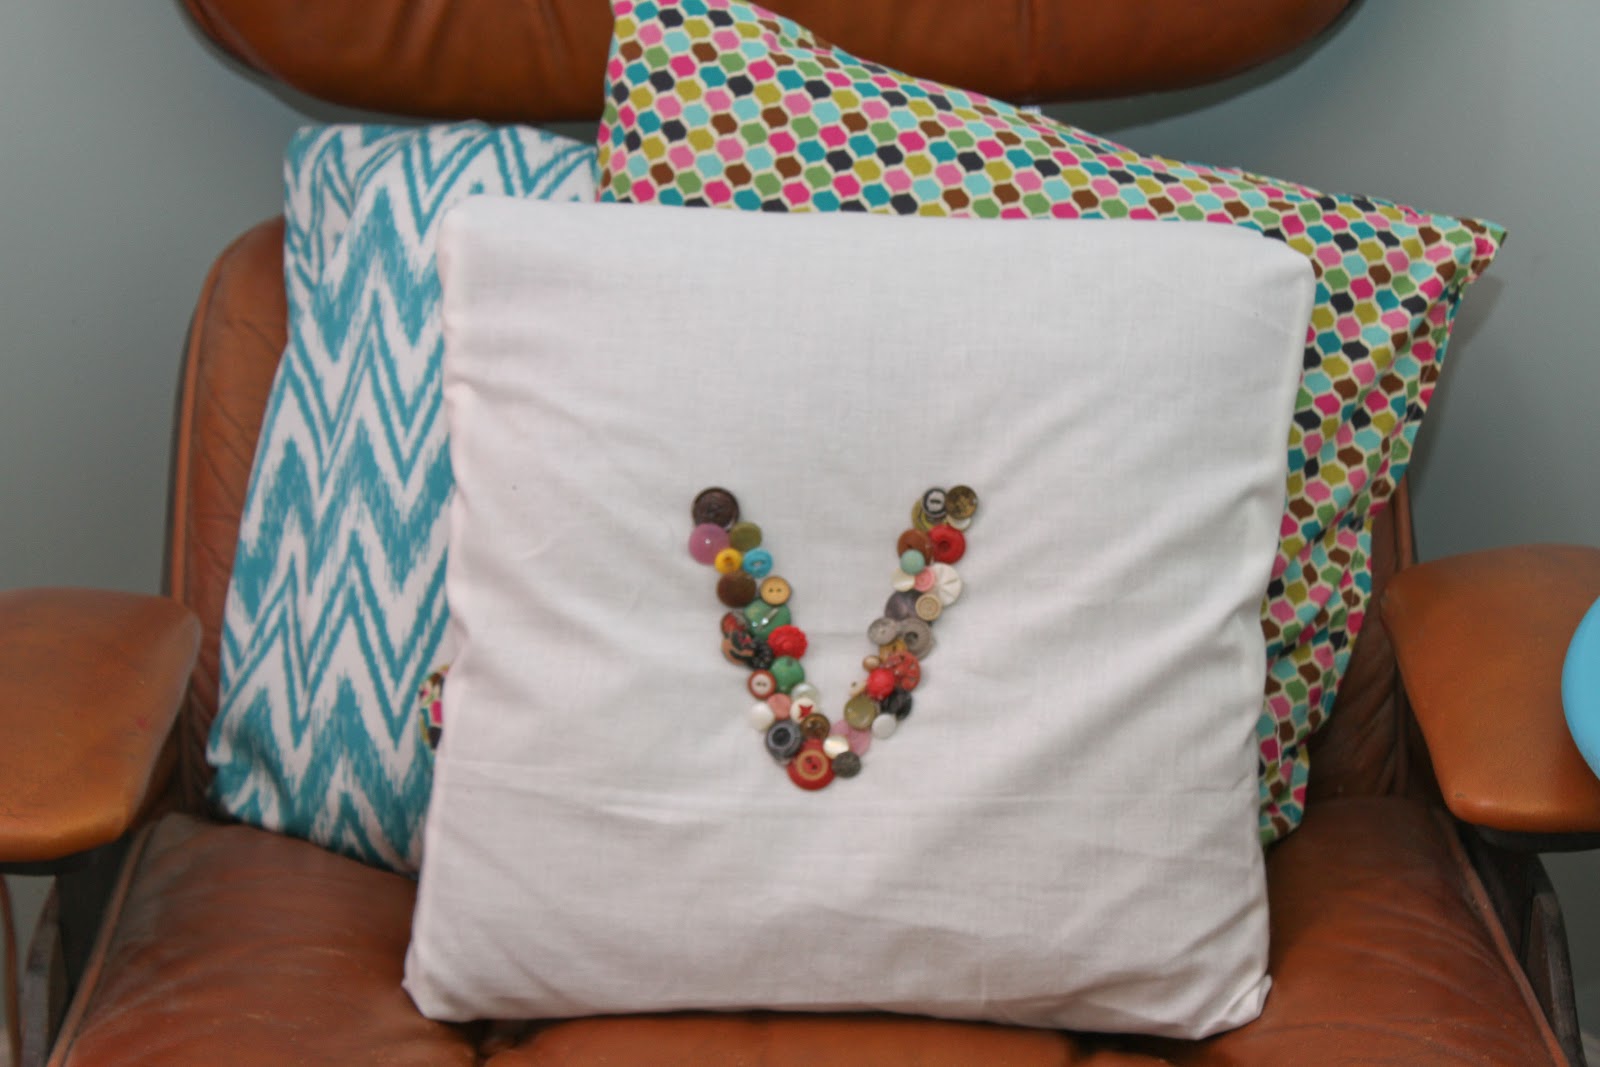
+ Sewed the pillows
I spent about $10 on fabric in coordinating colors and patterns and sewed 4 pillows. To create the “V” pillow, I found a box of some old buttons that belonged to my great grandma and hot glued them in a v shape. I like that I was able to reuse something so old and meaningful in the room.
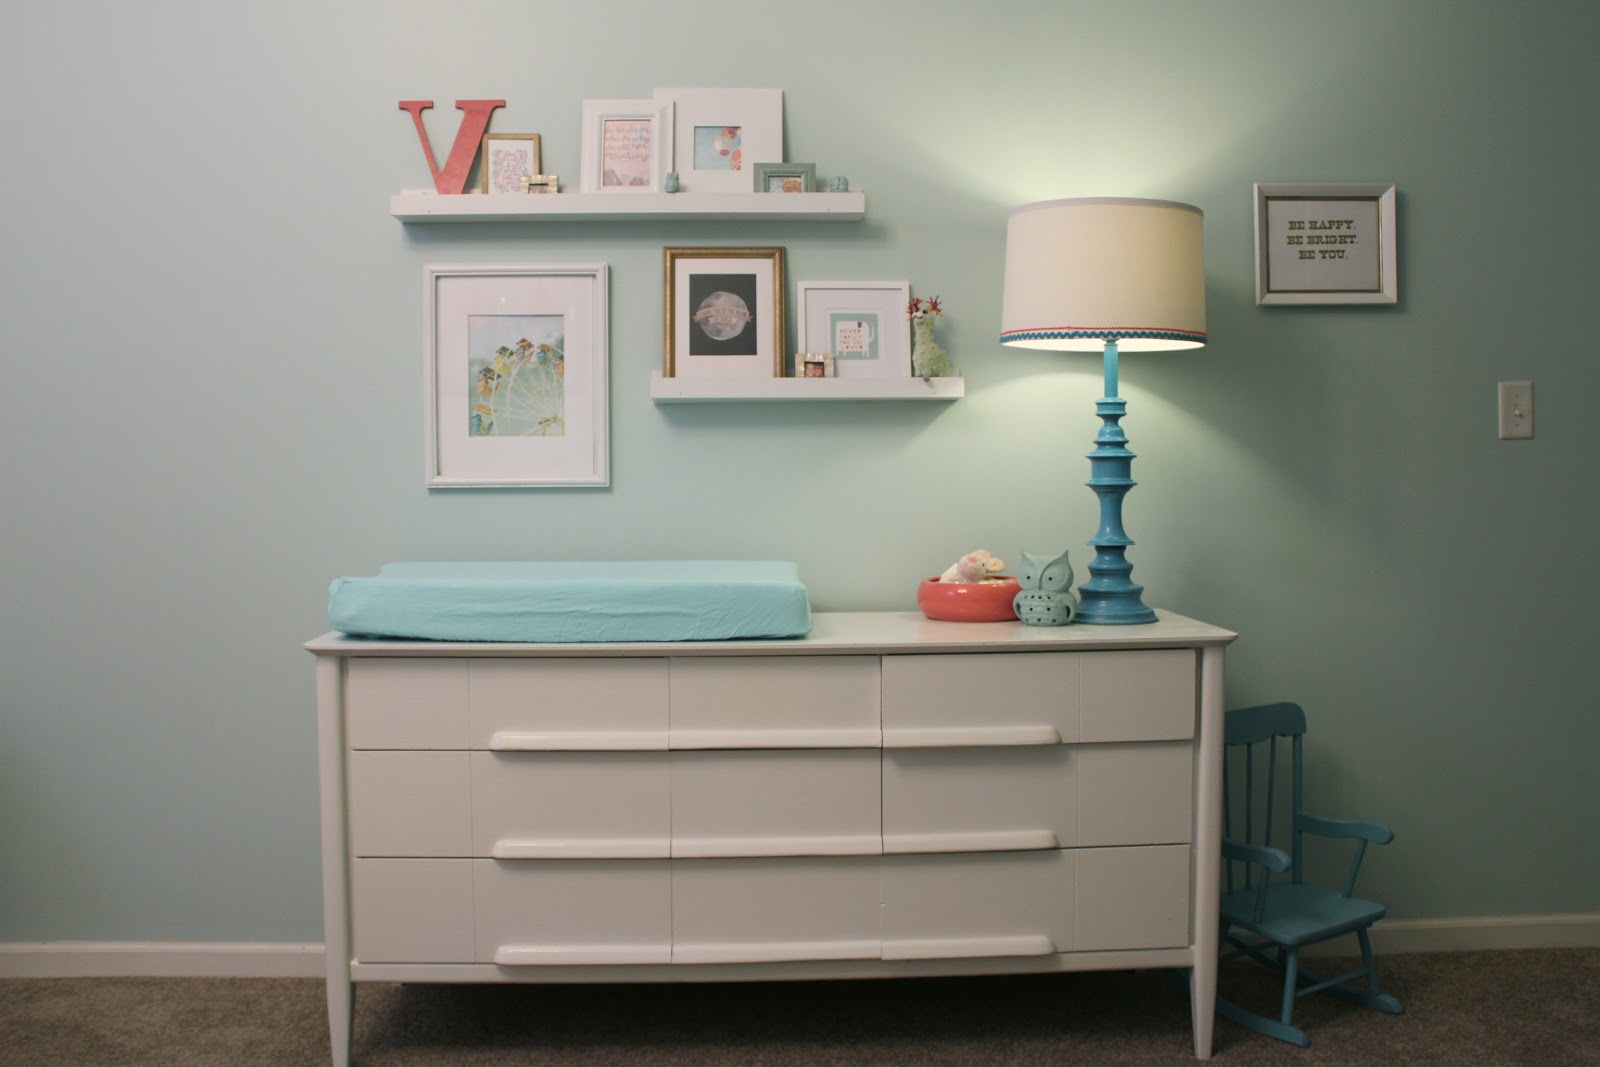
+ Repurposed the lamp on changing table/dresser
I had a cool lamp base that was given to me by some past co-workers that I spray painted, added a $5 shade to and the extra ric rac. This was an inexpensive and easy project taking only 10 minutes and costing only $5.
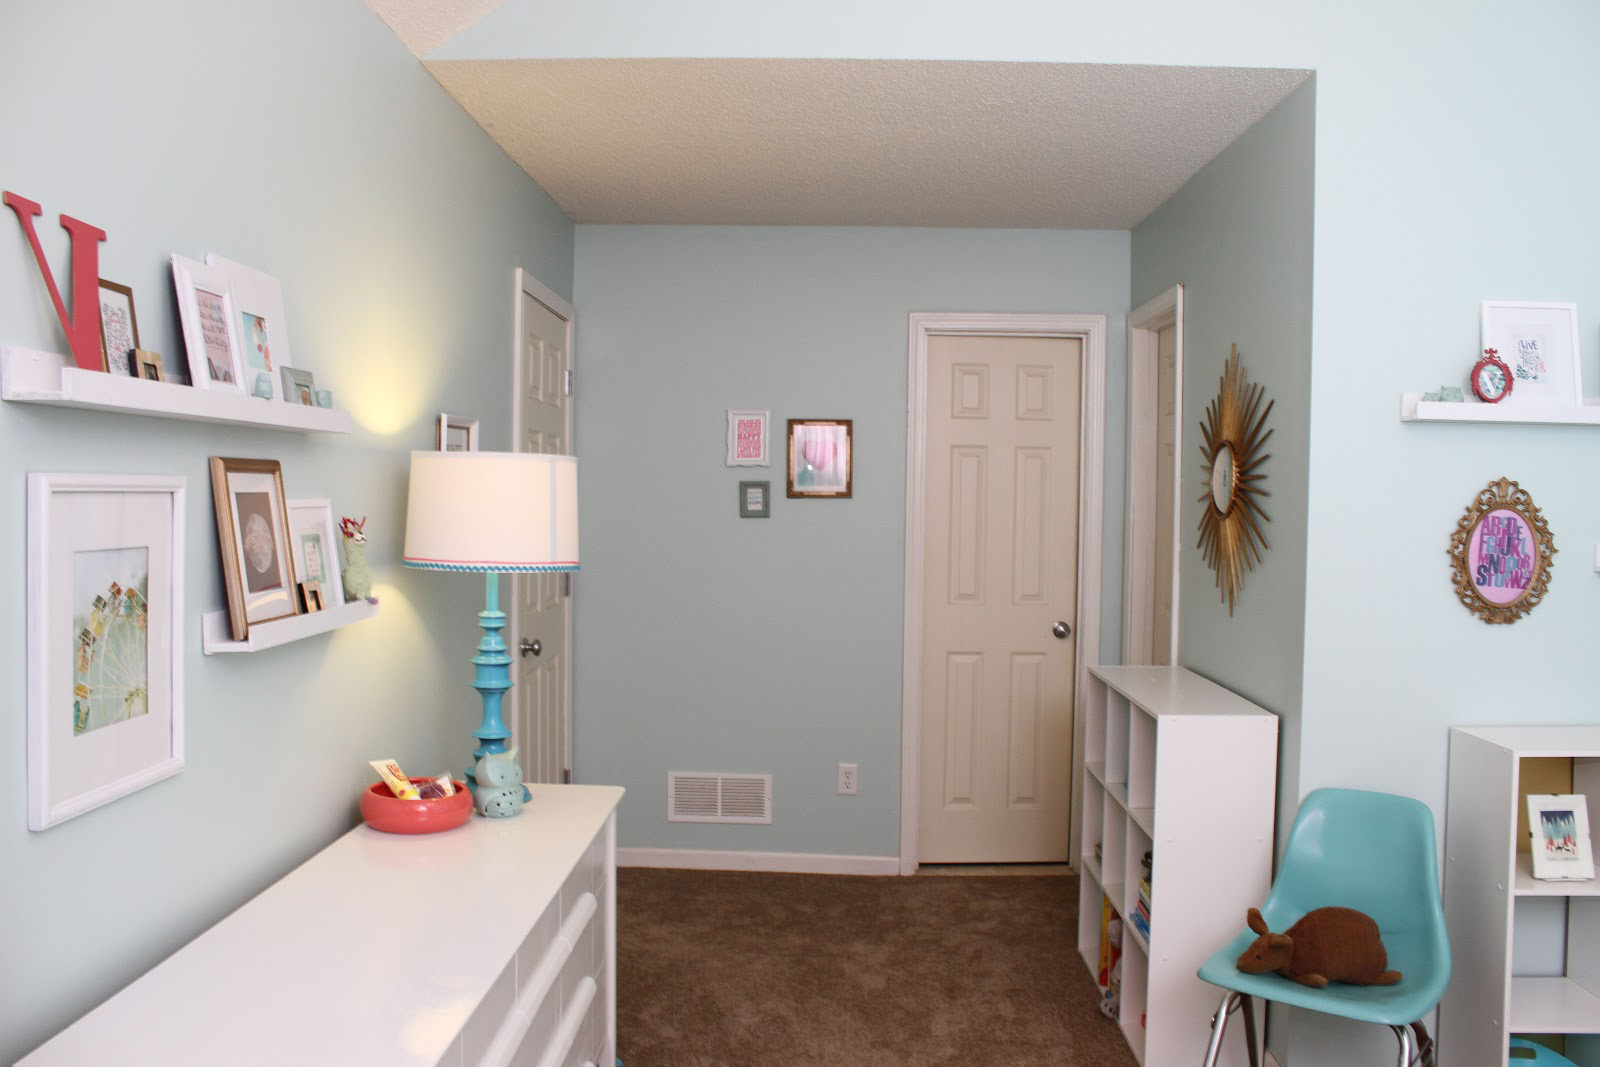
+ Created 4 custom ledge shelves
I searched the internet far and wide and only found the ledge shelving that I was envisioning at Ikea. Since we won’t have our Ikea until next Spring and we didn’t want to spend 300% extra on shipping them, I set out to create my own (with the help from the hubby). I mostly followed this
blog post as a guide. Miraculously we found the wood already cut to the exact sizes we needed at our local Home Depot store. We went with 2 longer shelves and 2 shorter ones. This project cost us roughly $20.
+ Found and repurposed the changing table/dresser
Our neighbors had the dresser out on the curb one day. I saw major potential and asked if I could take it. My husband thought I was crazy for wanting it, but after a few coats of fresh white paint, it turned out beautifully and fits perfectly in the room.
+ Repurposed the ceramic owls (on shelves and dresser)
I got these from my great grandma (a fellow owl lover) and a various thrift stores years ago. I sprayed them all a light aqua and used them in the decor at our DIY wedding. I like that we are sort of passing them down to our daughter as well.
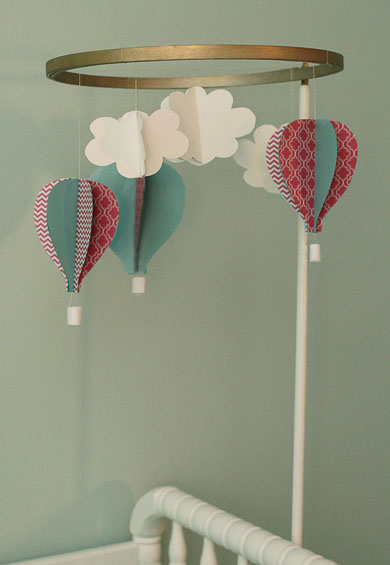
+ Created the hot air balloon mobile from scratch
I created 3 clouds and 3 hot air balloons from some Hobby Lobby scrapbook paper. I created some stencils and cut all of my paper to size, sewed them together and then glued the paper together to form balloon shapes. The gondola/basket is just some rolled up paper. I used one of my great grandma’s old crocheting hoops, which I spray painted gold (and fishing line) to hold it all together. I took a white dowel rod from an old drying rack that we don’t use and attached it to the crib with a couple of zip ties, then attached it to the hoop using the provided screw. I am very happy with how this one turned out and am glad I was able to make it from scratch for less than $5.
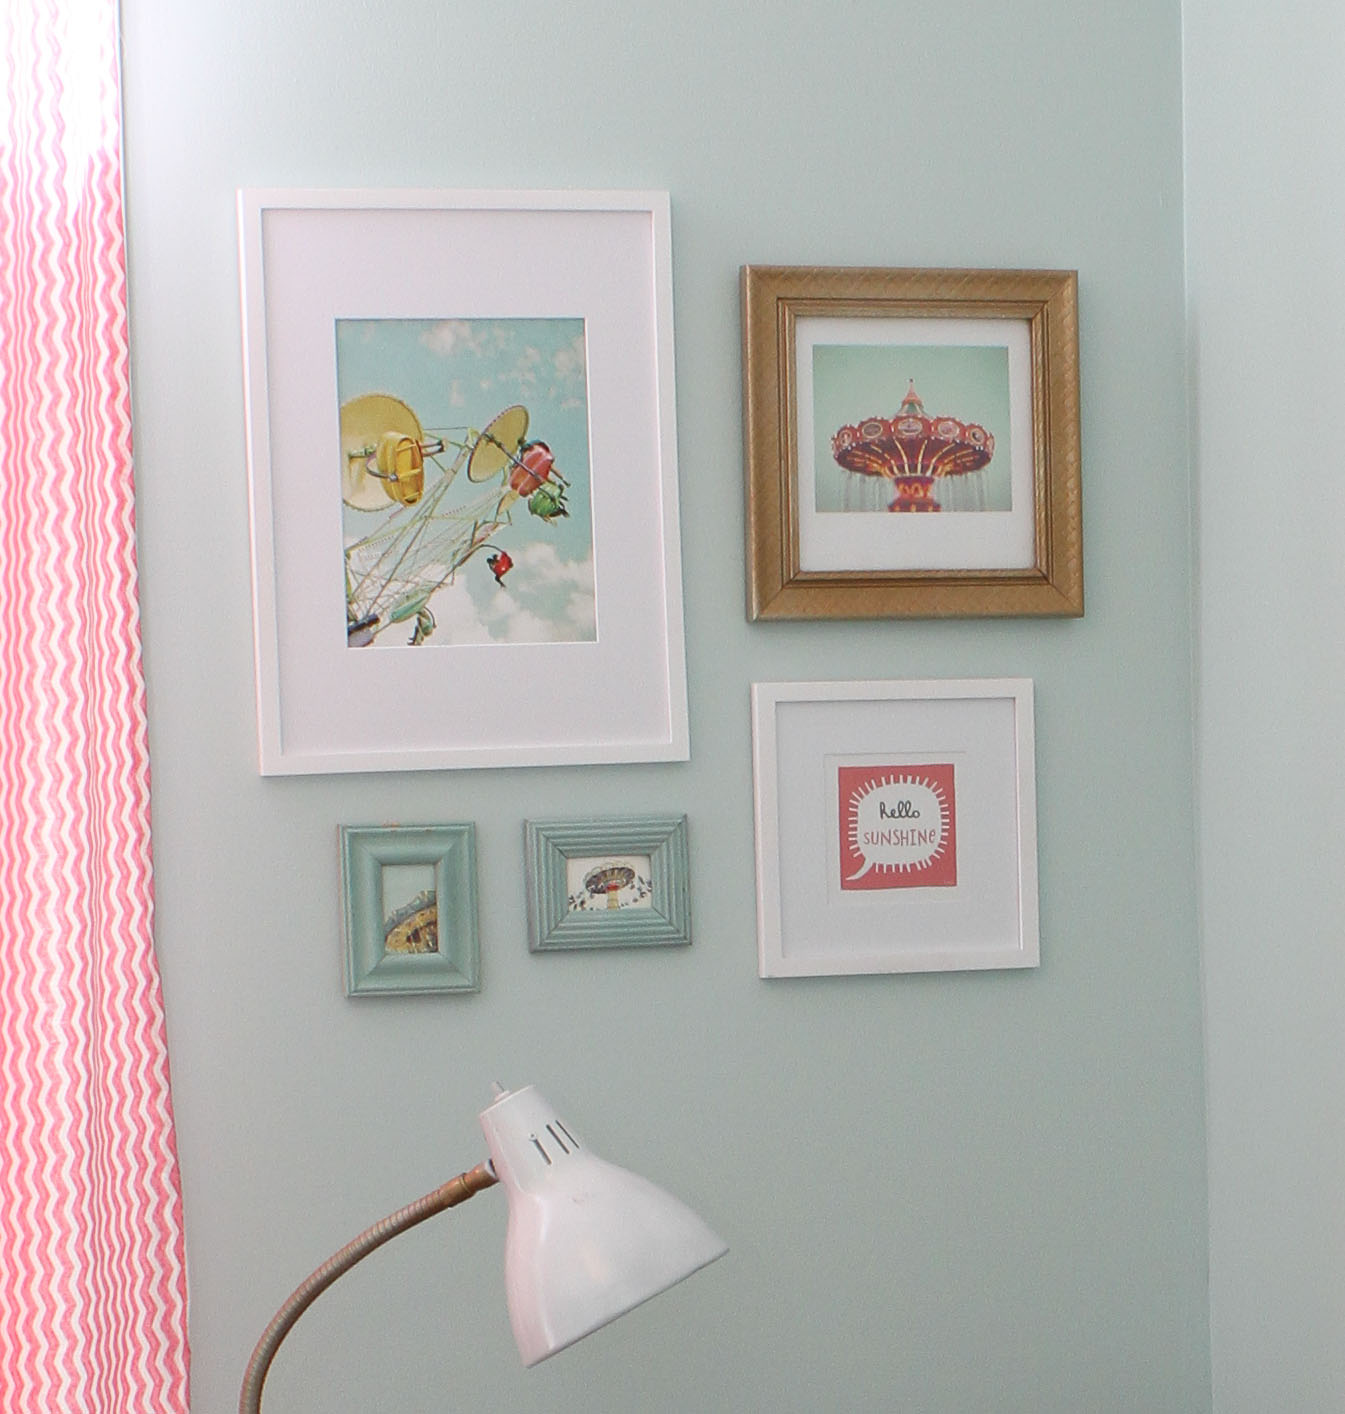
+ Created 80% of the wall art and frames
Framed art/prints can be so expensive. I only budgeted $75 for art AND frames, and didn’t want it to look like I skimped. So I had to get super creative. I started out at my favorite local
thrift store and filled my cart with tons of atrocious frames in various sizes and finishes. I knew with some glossy white paint and gold spray paint I could transform the hideous art into something beautiful.
I created most of the prints/art myself and also saved some free (downloadable + printable) prints over the years that I pulled up and printed. I had a $75 credit to art.com (thanks to a living social credit!) which I used to get the the vintage carnival prints. I bought a couple of the prints from etsy. The room has a total of 31 framed prints in it and came in at a budgeted $75.
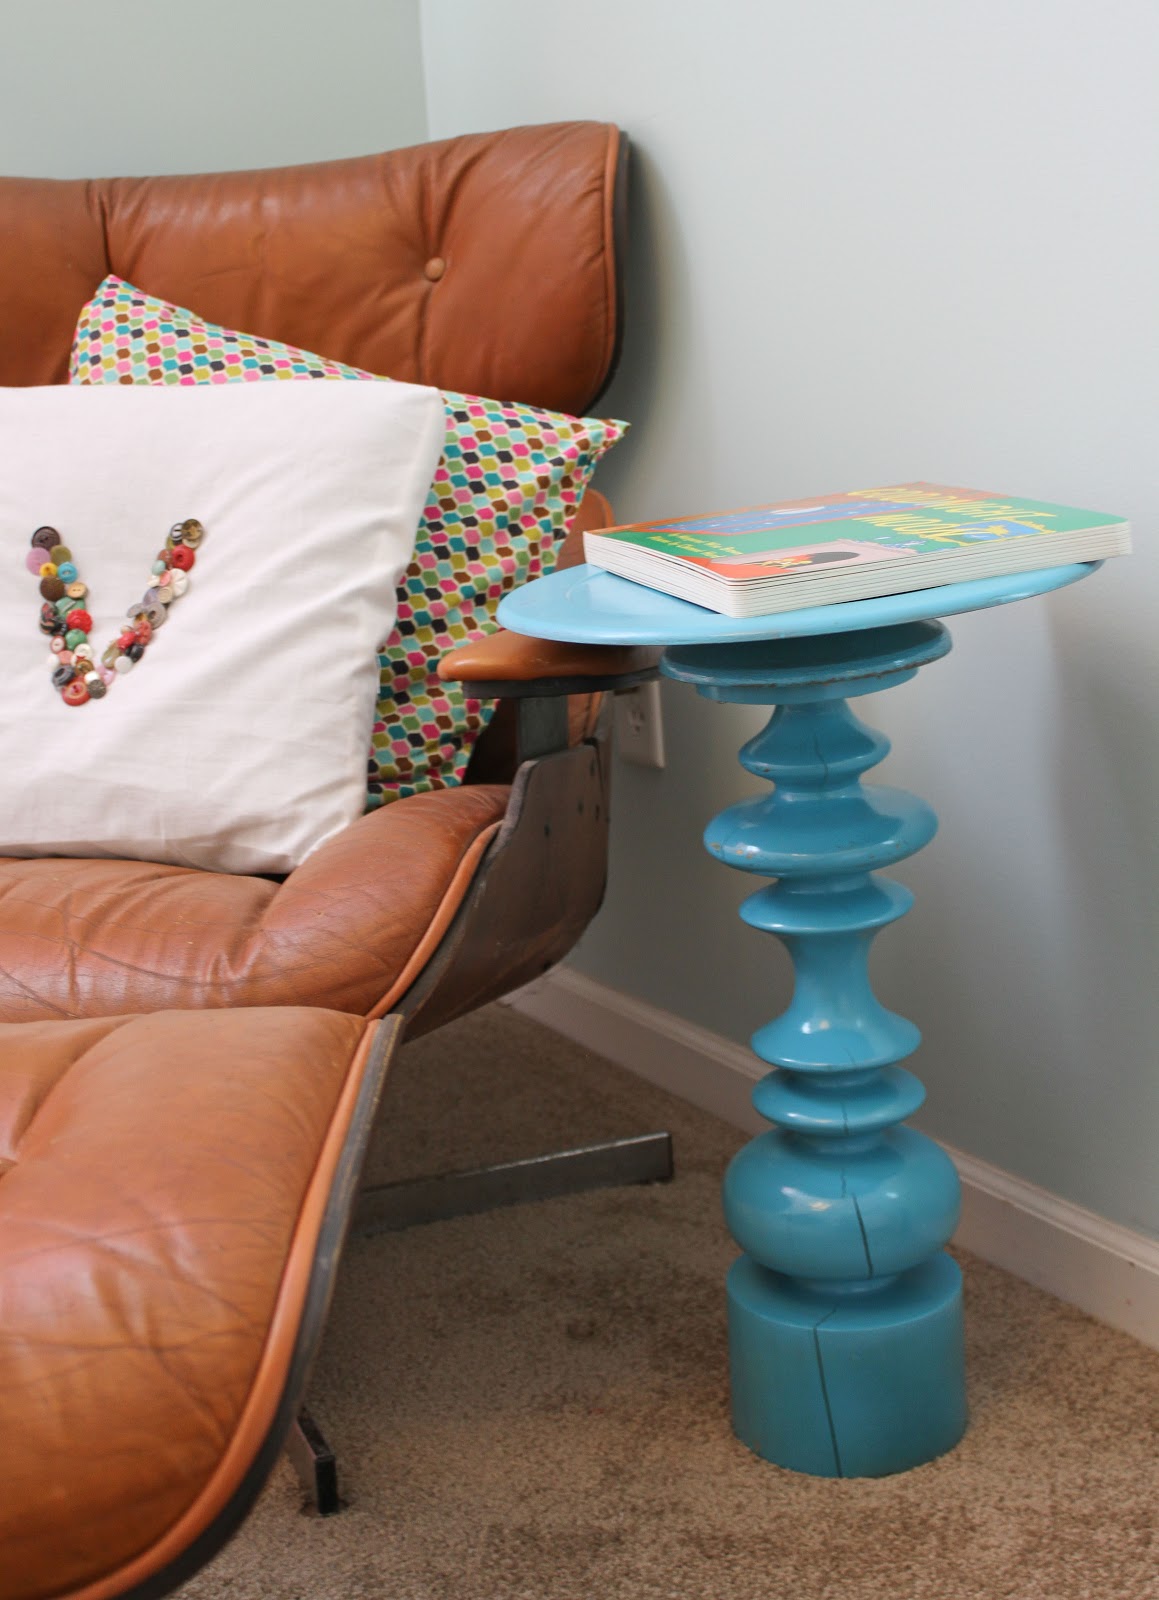
+ Created the side table
I found a large wooden candlestick and a wooden lazy susan at the same thrift store. I simply attached them with epoxy and spray painted them the same shade to create a unique modern table. This only cost me $8.
+ Repurposed 2 white cubby shelves
I “borrowed” 2 shelves from our master closet, spray painted and attached gold backers to them and filled them with both of our old baby books (that our parents thankfully hung on to for us), storage bins from the dollar tree and other knick knacks that I either created or found. At some point I need to replace the shelves in the closet. 🙂
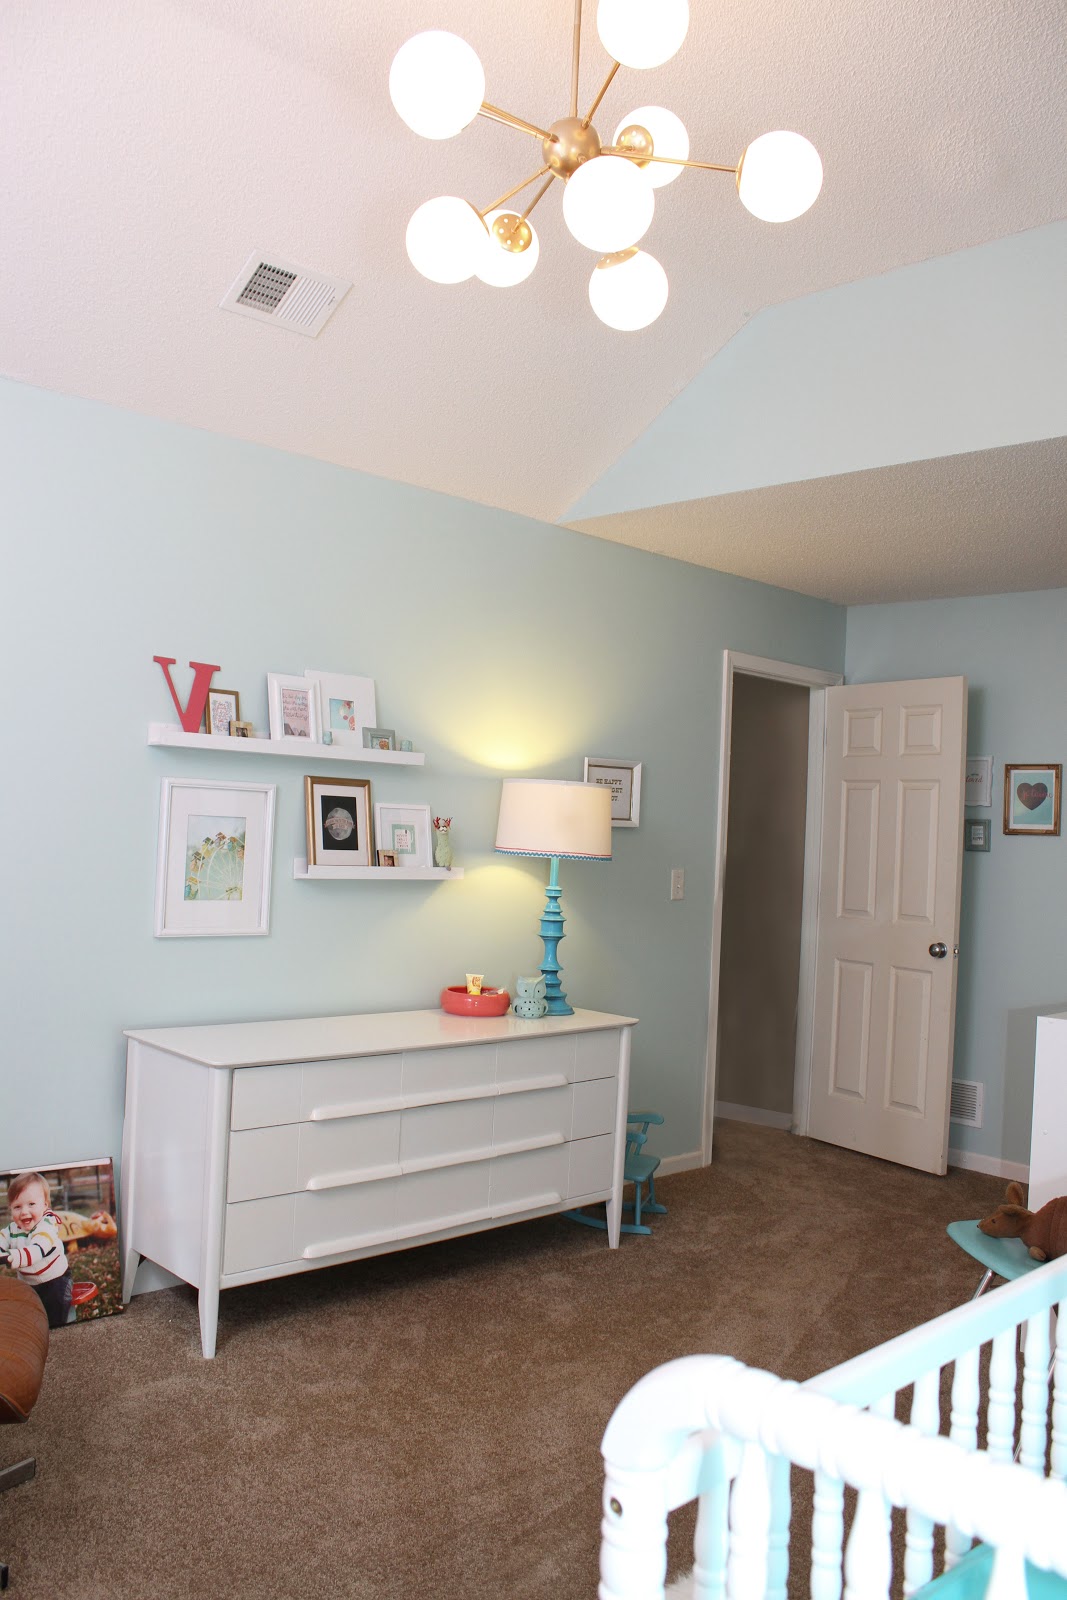
+ Customized the funky retro light fixture
I also searched the internet far and wide for a cool statement light and mainly only found fixtures that were $1,000 or more (even on Ebay and Etsy). I settled on a cool
fixture from overstock.com where I hit a great sale, used a gift card and coupon code, which knocked it down from $279 to around $180. This was my only splurge item, but I am SOOO happy with it. I transformed it from silver/chrome to a brushed gold (with spray paint) so that it would fit with my other brushed gold accents. This is by far my favorite piece of the room.
+ Created the window seat/storage cubby and cushion
I bought a $20 shelf from target and put it on it’s side, reinforced it and sewed a foam, fabric covered cushion for it. Eventually I might want to double the width with a second shelf unit and cushion.
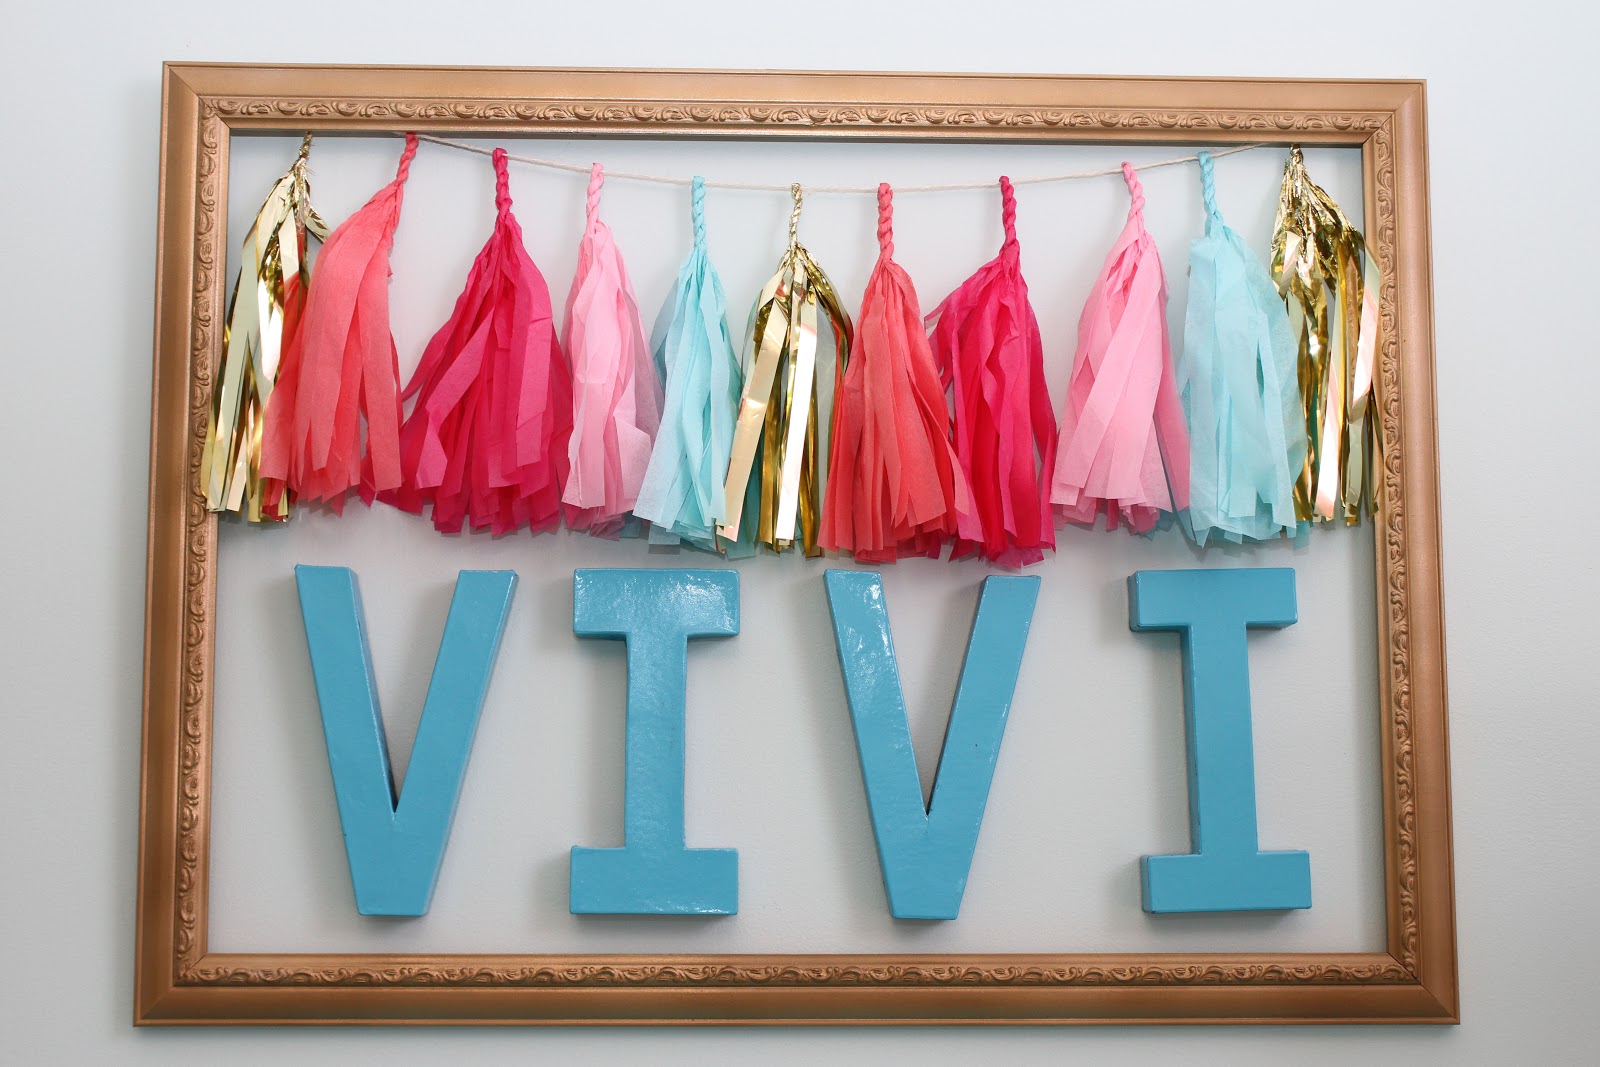
+ Created the art above the crib
I ordered the craft letters from
this site for only $8 shipped, spray painted them and hung some pretty tissue tassle garland above it between both sides of the large gold frame. I have
made the tassle garland myself in the past, but ran out of time to make some for the nursery so I found a tissue tassle expert on etsy who I paid to create the garland for me. I have about 10′ more of this garland, which I will use for a wedding shower that I am hosting, Vivi’s first birthday party, some photo shoots and other events, so it will definitely get put to good use. In total this project cost about $40.
+ Created 2 hanging hot air balloons
Found 2 plastic balloon shapes at Hobby Lobby on clearance, painted them and added some empty thread spools for the basket. I hung them from the ceiling with fishing line. This project cost me $5.
+ Repurposed an old reading lamp
Ted got a free chrome floor reading lamp awhile back. I spray painted it white and brushed gold and we will use it as a reading lamp.
+ Found the other Eames style modern turquoise chair on ebay
I plan on using this chair for Vivi’s monthly photo. I love the shape and the color. It was $30.
+ Repurposed the sunburst mirror
I got this at
Home Depot for a steal of a deal and love it!
ITEMS THAT WERE GIFTED OR HANDED DOWN:
+ The white Jenny Lind crib
This was a gift from my parents. I love the vintage feel to it and best part – it was only around $150.
+ Repurposed Eames reproduction chair
Ted’s dad bought this chair in the 70’s and he inherited it from him. I absolutely love that it belonged to Ted’s late father and think it goes perfectly in the room.
+ Reused toys, books, games, etc.
I filled the room and toy box with favorite old stuffed animals, books and vintage games from our childhoods and from family members.


At Wally Wall Art, you can order unique and customizable wall decals, wall stickers, wall tattoos for any room. We can also utilize your own design to create truly customizable wall decals.
http://wallywallart.com/
At Wally Wall Art, you can order unique and customizable wall decals, wall stickers, wall tattoos for any room. We can also utilize your own design to create truly customizable wall decals.
http://wallywallart.com/
I love this room! The colors, the details, the old with the new! Great job! I'm your newest follower too!
Corey from tinysidekick.com
Love the combination of the turquoise and pink. It's perfect for a little girl. I like that your combination of these colors feels chic and not sugary.
I featured your makeover on my latest post of Get Your Color On!, a blog series that features other bloggers' projects and tips on how to decorate with a particular color.
Feel free to paste a button from this series. You can check out the post here:
http://creativeblossoming.com/2013/08/08/get-your-color-on-turquoise-aqua/
Great job and thanks for sharing!
thanks so much angela!! i appreciate the feature and also LOVE your blog…i am your newest follower. 🙂
Oh my goodness, the room looks so awesome what a great place for Vivi to come home to. I am super impressed with your creativity and the fact that you did it under your tight budget. Congrats and I wish you and you husband all of the best as you welcome you little girl into your lives. Hollie {thepinkzipper.blogspot.ca}
Thanks so much for the kind words Hollie!! 🙂
Hi! Came over here via House of Turquoise and while I adore Vivienne's nursery (and her name!), I'm super excited to see another home with cream colored doors! I hated my white doors, so I tried glossy black, a deep gray-blue, then finally settled on a creamy white.
Love her simple, button "V" pillow!
Aww thanks so much Christina!!! 🙂
What a beautiful and loving room! I'd love to know how exactly you reinforced the Target cubbies to make a bench. Please share if you can!
Anne
Wow….just wow!
I love that it's not over the top girly and yet still feminine in the best sense of the word (read: no explosion of bubble gum pink!)
Plus that light…that light makes me drool…
I found your link through the YHL forums and I'm happy I did! I love your style!
thanks so much…that is exactly what i was going for…not overly girly. 😀
i appreciate your nice comment…see you over on YSL forum…my new addiction.
xo
What color did you use on the wall? It's gorgeous!
Thanks!! Behr Tide Pools. 🙂
thank you! 🙂
hmmm…that's a good question on the family math, ha.
Fabulous. Beautiful. Will our kids be second cousins, or first cousins once removed? I have never understood family math.