{also featured on kcmag.com}
Do you love using unique vintage elements in your decor? Are you looking for a new way to spruce up your dining room table for your next dinner party? Are you throwing a vintage inspired wedding or shower any time soon? If you answered yes to any of these questions, you might be interested in making your own DIY vintage table runner…using doilies. Yes I said it…doilies!
I know, I know, up until about a month ago when I heard the word “doily” I instantly pictured an old grannies overcrowded home with doilies all over the place, and let’s be honest it is just an ugly word.
But lately I have seen a lot of beautiful home and entertaining doily decor ideas on Pinterest … that being said I am officially on the doily bandwagon.
Do you want to hop on with me? If so follow these simple steps to create your very own custom made vintage doily table runner.
You will need:
+Vintage doilies in varying sizes (large, medium and small)
+Sewing needle
+Light colored thread
+Scissors
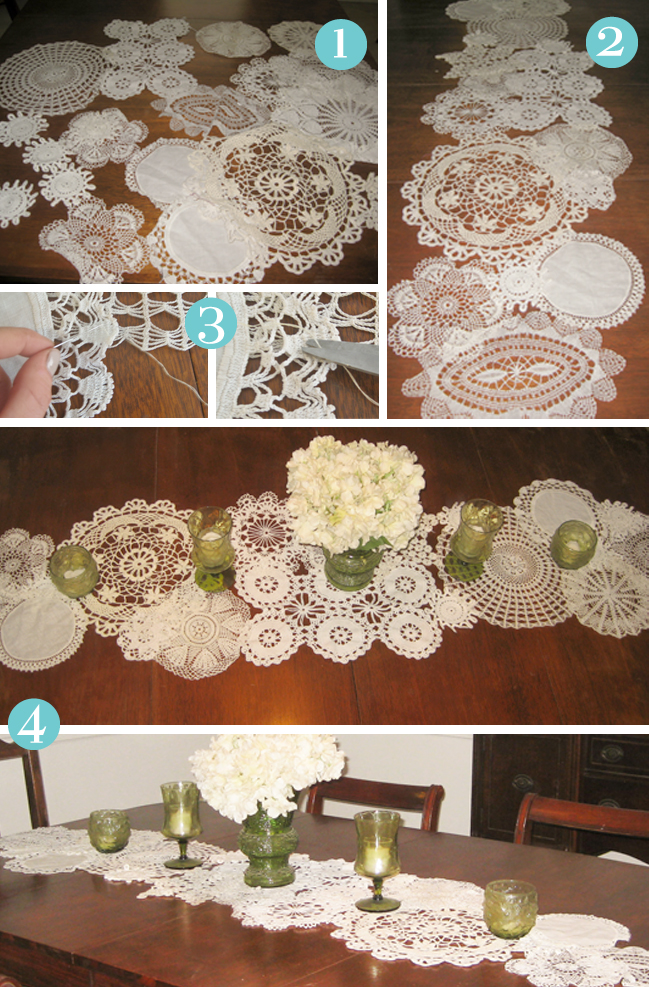
1. Gather 15-16 doilies in varying sizes to cover the length of a medium sized table. Add more doilies if your table is longer. I used some that my grandma passed on to me and went to my favorite antique stores to collect the rest.
I suggest doily shopping at my favorite antique store Sentimental Journey if you’ re in the Olathe area, Bottoms Up Antique Market if you’re in the West Bottoms or River Market Antique Mall if you’re in the River Market area.
Also just FYI if you want to do this project on the cheap, keep digging until you find them in the $1-4 range. Some antique vendors over price their doilies in my opinion. Wow, I sound like a crazy doily expert right now!
2. Stagger the largest doilies across the length of the table leaving about an inch or two in between them (I recommend using 4-5 large doilies for a medium sized table), then fill in the blank areas with the medium sized doilies. Lastly fill in the remaining blank areas with the small doilies. You will want almost all of the doilies to slightly overlap each other. I used both white and cream colored doilies to add interest.
You will want to adjust the doilies until you are happy with their placements. There really is no wrong way to lay them out, so just go with what looks good to you.
3. Take a needle and thread and string one loop through each overlapping doilie. Using your scissors, trim off the excess thread.
Repeat this step until all doilies are secured together.
4. Once your table runner is complete, place your favorite table decor items on top and voilà, you are all done!
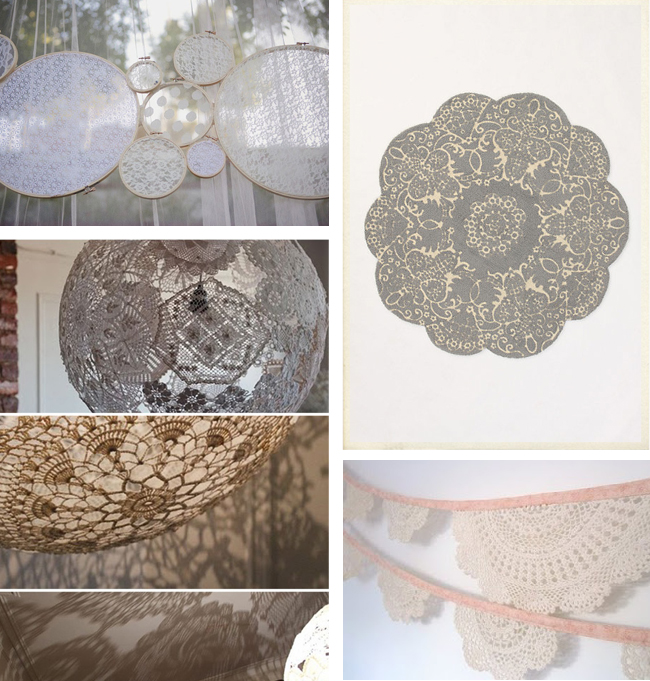
Here are a few more doily inspired decor and craft project ideas: