{Featured on KCMag.com!}
Make your own personalized paper banner
Paper banners are a fun way to add some personalization and color to your gift table or dessert area. They are pretty simple to make and can be created using supplies that you already have.
I used the following items already in my house to create my banner. From start to finish this project took me about 25 minutes.
+ 7 sheets of white card stock paper (letter sized)
+ Ribbon
+ Hole punch
+ Color printer
+ Color printer

1. First I designed the 4″ x 4″ squares using Adobe Illustrator. I used a chevron pattern for the background design and picked a bold font for my lettering. I laid out 4 squares per letter sized sheet. Each square had one letter or number in it to spell out “60 H-A-P-P-Y B-D-A-Y A-N-N-I-E 60”
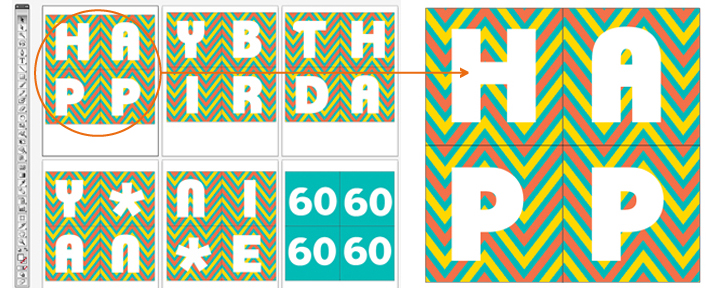
2. Next I printed out my sheets on my color printer and cut them all down to squares using scissors (you can use a paper cutter or an exact knife too if you wish)
If you are not a designer and don’t have the software or a color printer here is an easy alternate idea:
A. Instead of designing your own background and lettering, you can download a generic happy birthday or congratulations template that I already designed for you here.
B. Or you can also go to a craft store and buy 5-6 12 x 12 sheets of your favorite scrapbook paper. There are many designs to choose from and they come in heavy paper weights that work for a project like this. Along with the paper you will want to buy large scrapbook letter stickers or foam letter stickers in whatever color you choose. You will want the letters to be at least 2″ tall. Cut the squares to the desired size and stick the appropriate letter to the appropriate square.
You can find the foam letter stickers here for only $1
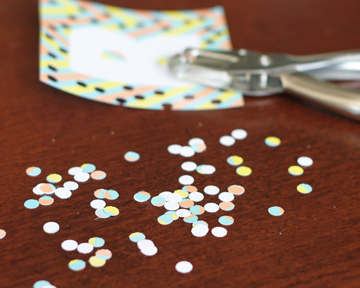
3. After I cut out all of my squares I hole punched 2 holes at the top of each square (make sure you don’t punch too close to the edge)
4. Next I looped my ribbon through the holes until i had each letter placed. You can slide the squares as needed to get the desired spacing. You will want to use a 1/2″ – 3/4″ thick ribbon. This thickness holds each square into place while still allowing you to shift them as needed.
5. Finally I hammered a small nail to hold the 2 ends in place (you can also use tacks, heavy duty tape or adhesive).
Note: You can choose to fit every letter on one ribbon or use 2 strands like I did. I used 2 strands because it fit better in my setup .If using 2 strands you will just need to tie the ends of the shorter stands to the strand above it. If nailed, the top strand will be sturdy and can hold the extra weight.

And there you have it! Step back and admire your work.

Extra tip: Use the holes that you punched from your squares as confetti (I punched out extra holes from some extra squares for even more confetti).
Great job!! Very cute! 🙂 And I love the confetti idea!!